Quite some time ago, I wrote [an entry on what was then on my painting table](http://www.nirya.be/snv/ttm/archives/000051.html). I thought the time was ripe to do so again.
So, currently on my painting table are:
* 28mm Celtic warriors -- yes, more of them, and still for my WAB army. I'm currently wrapping up the 1000 points - 4 more warriors and 10 javelinmen I recently found out are in my army list. Of the warriors, one is already painted, two are three quarters painted, and the fourth is still in primed state. The javelinmen are still in the prepping stage. I'm planning on decking them out with lots of javelins apiece to really go for the porcupine look. I'm using Brico 25mm framing pins for the javelins, so I'm hoping that I get to play JP with the Celts. Years ago he has sold me a Lysimachid army using sharpened steel pins for javelins and pikes, and they draw blood every time I play with them. This can be my revenge :)
As to manufacturers, the warriors are Old Glory (the last ones from a pack of 30 I bought in the now defunct but ever fragrant _Figs_ shop in Brussels, probably as my very first purchase of historical miniatures). The javelinmen are Foundry.
* 28 mm Carolingian Franks -- these are the start of one of the armies that will (hopefully, given the projected time sink in the near future) feature in this year's Crisis game. The figures I'm currently painting are from Artizan Designs newest range and are very nice indeed.
* 28mm Viking -- this one will feature in the Crisis game as well. For the Vikings of that game, I'm planning on only painting a few character figures, with the bulk of the troops made up of suitable Dark Age warriors from Alan's Saxon army and the Vikings from old stalwart David van Dijck. The figures I'm painting now are from one version of Foundry's _Ragnar's raiders_ pack. In another of Foundry's questionable marketing practices, the pack I bought (from the Mons shop at the recent Gent convention) contains a completely different set of miniatures (both in number and kind) as the one currently listed on the Foundry website. Go figure.
* 28mm [Dwarven crossbowteam](http://www.hobbyproducts.com/images/html_en/18018.htm) -- from Hobby Products. These are being painted for sale on eBay (or anyone reading this and is interested - the first of the crewmen can be seen on [this photo](http://www.flickr.com/photos/robartes/105994590/in/set-27460/). They're about three quarters done.
As to plans, I have decided to bring the Celts up to only 1000 points for now, and then concentrate on the Carolingians to at least have a hope of getting enough of them done for the Crisis game. With baby number two arriving any day now, I expect that over the next few months, my painting time will be diminished drastically.
What's on everyone else's painting table?
__TT tags__: miniatureswargaming

Wednesday, 29 March 2006
Sunday, 26 March 2006
Hyperborea - start up
Some years ago we ran an amusing Ancients campaign, inspired vaguely by the Tony Bath Hyboria model. It lasted 12 months or so before dying a natural death, partly GM fatigue and also because players didn't really have the time to devote to it.
Version two is about to be launched and here are the basic rules and ideas:
Download file
Alan
And here is the map. It was made in Campaing Cartographer.
View image
Version two is about to be launched and here are the basic rules and ideas:
Download file
Alan
And here is the map. It was made in Campaing Cartographer.
View image
Wednesday, 22 March 2006
WEC round 4 - Gauls vs Saxons
Yesterday Alan came over to Zemst for our game in round 4 of the
[WEC](http://www.nirya.be/snv/sections/WEC) - his Saxons fighting for
civilisation versus my Gauls fighting for the barbarians. This was the first
game up in the attic that has been recently promoted to wargames room (due
to the evacuation of the old one that is now fast becoming child number
two's room).
The armies were 1000 points each (well, mine was 959 -- I only noticed
halfway through the game that I had a unit of javelin armed skirmishers on
the army list that I had not painted yet) and we played the 'Breakthrough'
scenario, with the Saxons having to break through the Gauls. The Saxon army
was from the Shieldwall supplement, the Gauls came from the list in the
Hannibal and the Punic Wars book, which is much more realistic and
historical than the vanilla barbarian list in the basic book (not to mention
the heavy throwing spears you could give your Celts with it and FoTW).
The Saxon army consisted of two big warrior blocks of 32 men. The front rank
of each consisted of thegns (armoured WS4 and strength 4 brutes), and both
had a character in them wielding a double handed axe. The rest of the
warrriors were ceorls. All were armed with thrusting spears. A third block
of warriors was slightly smaller, consisting only of 20 men and having no
character leading them. Two units of skirmishers, one with javelins and one
with bows, and the general rounded out the army.
[The Gauls]() have [featured here before]() -- the only change from that army is
that yesterday's list did not include the army standard bearer and should
have included a unit of javelinmen extra. These last are now on my work desk
for painting prep :).
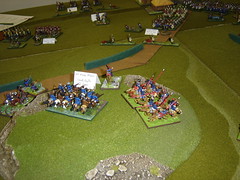
We played on a standard 6'x4' table, which had a river on one flank, some
woods and a steep hill on the smallest side of the table, and some gentle
hills and woods scattered throughout the rest of the table:
The Saxons deployed with, from their left on the river to their right, the
bowmen, the two big warrior blocks, the smaller warrior block and the
javelinmen on the right flank. The general was stationed behind the two big
warbands. I deployed the Gauls, from our right on the river to our left,
with the chariots against the river, the two regular warbands next and the
fanatics on the left. The bowmen were covering the front of the fanatics
and the leftmost warband. Bartolomix was stationed in his customary position
between the Malini and Zemstiani.
<-- insert map here -->
My deployment turned out to be a bit suboptimal. On the one hand, the
skirmishers are actually slower than the warbands and fanatics, so they hold
them up by standing in front of them. On the other hand, my chariots would
probably have been better placed on the far left flank, behind the main
battle line. This was compounded by the fact that the Saxons, being the
party breaking through in the scenario, got to deploy their units after all
of the Gauls were deployed, so could tailor their deployment to ours.
Turn one saw a general advance of both armies, with some desultory bow fire
resulting in very few casualties. The real fun started in turn 2 when my
chariots declared a charge on the Saxon bowmen in front of them, only to
have them fire (killing one chariot) and flee out of reach. This opened up a
charge opportunity (redirected charge) on the Saxon warband block behind
them. This is where I made my first mistake -- I reasoned that the chariots
would be charged the next turn anyway so I declared that they redirected
their charge against the warband (a great idea). What I should have done was
to make it a failed charge, and chosen fire and flee as the reaction to the
inevitable charge of the Saxons next turn. That way, I had a good chance of
getting away from the Saxons and possibly keeping the chariots in the game
if they managed to rally. As it was, the charge of four chariots against 32
Saxons was predictably a massacre: my chariots were summarily dealt with and
the lone survivor chased down and killed in the next turn:
<-- insert map here -->
While the chariots were meeting their bumpy end on the right flank, the game
defining charge and subsequent melee was taking place in the center. The
Malini, one of the regular warband units, and Bartolomix himself charged the
32 man warband unit in front of them. This was very much a make or break
charge. With the fanatics out on the left flank trying to maneuver on the
flank of the third Saxon warband, I needed some other hammerblow to knock
out a Saxon unit -- hence the charge of warband and general. If I would be
able to win the combat, the Gauls would autobreak the Saxons and things
would start looking very good indeed. To make things more interesting,
Bartolomix challenged the opposing 2 handed axe wielding character.
Well, it turned out to be a frustating round of combat. To begin with,
Bartolomix, although outclassing the Saxon wild man on stats, managed to
only score one wound (which was saved) and had to endure the ignominy of
receiving a wound in return (that did not save). The rest of the warband (7
attacks with rerolls of misses - HatPW mixed weapons rule) only managed to
score one extra wound. So 2 wounds to the Celts. Not very good. Luckily, the
Saxons only scored 2 wounds as well (appaling dice rolling on both sides),
and with equal numbers of ranks (4) and standard bearers (1) on both sides,
it came down to a musician roll-off: a battle of the horns (carnyx vs
hollowed out piece of cow). Tension mounted as the dice tumbled ... drat ...
a Gallic one to the Saxon five. A lost combat and the chance of breaking the
Saxon warband was gone for good.
<-- insert map here -->
The Saxon reply in their round of combat saw a massive difference in wounds
inflicted - my 2 versus the Saxon 9 or so, resulting in both the Gallic
warband and Bartolomix breaking from the combat. To add injury to insult,
Bartolomix tripped over his cloak while running and was caught by the
pursuing Saxons. Cue one dead general and a general panic test for the
Gallic army. Luckily, my two intact units (the other warband and the
fanatics) held their morale, although the rest of the army was now fleeing
back to the roundhouse.
[WEC](http://www.nirya.be/snv/sections/WEC) - his Saxons fighting for
civilisation versus my Gauls fighting for the barbarians. This was the first
game up in the attic that has been recently promoted to wargames room (due
to the evacuation of the old one that is now fast becoming child number
two's room).
The armies were 1000 points each (well, mine was 959 -- I only noticed
halfway through the game that I had a unit of javelin armed skirmishers on
the army list that I had not painted yet) and we played the 'Breakthrough'
scenario, with the Saxons having to break through the Gauls. The Saxon army
was from the Shieldwall supplement, the Gauls came from the list in the
Hannibal and the Punic Wars book, which is much more realistic and
historical than the vanilla barbarian list in the basic book (not to mention
the heavy throwing spears you could give your Celts with it and FoTW).
The Saxon army consisted of two big warrior blocks of 32 men. The front rank
of each consisted of thegns (armoured WS4 and strength 4 brutes), and both
had a character in them wielding a double handed axe. The rest of the
warrriors were ceorls. All were armed with thrusting spears. A third block
of warriors was slightly smaller, consisting only of 20 men and having no
character leading them. Two units of skirmishers, one with javelins and one
with bows, and the general rounded out the army.
[The Gauls]() have [featured here before]() -- the only change from that army is
that yesterday's list did not include the army standard bearer and should
have included a unit of javelinmen extra. These last are now on my work desk
for painting prep :).
We played on a standard 6'x4' table, which had a river on one flank, some
woods and a steep hill on the smallest side of the table, and some gentle
hills and woods scattered throughout the rest of the table:
The Saxons deployed with, from their left on the river to their right, the
bowmen, the two big warrior blocks, the smaller warrior block and the
javelinmen on the right flank. The general was stationed behind the two big
warbands. I deployed the Gauls, from our right on the river to our left,
with the chariots against the river, the two regular warbands next and the
fanatics on the left. The bowmen were covering the front of the fanatics
and the leftmost warband. Bartolomix was stationed in his customary position
between the Malini and Zemstiani.
<-- insert map here -->
My deployment turned out to be a bit suboptimal. On the one hand, the
skirmishers are actually slower than the warbands and fanatics, so they hold
them up by standing in front of them. On the other hand, my chariots would
probably have been better placed on the far left flank, behind the main
battle line. This was compounded by the fact that the Saxons, being the
party breaking through in the scenario, got to deploy their units after all
of the Gauls were deployed, so could tailor their deployment to ours.
Turn one saw a general advance of both armies, with some desultory bow fire
resulting in very few casualties. The real fun started in turn 2 when my
chariots declared a charge on the Saxon bowmen in front of them, only to
have them fire (killing one chariot) and flee out of reach. This opened up a
charge opportunity (redirected charge) on the Saxon warband block behind
them. This is where I made my first mistake -- I reasoned that the chariots
would be charged the next turn anyway so I declared that they redirected
their charge against the warband (a great idea). What I should have done was
to make it a failed charge, and chosen fire and flee as the reaction to the
inevitable charge of the Saxons next turn. That way, I had a good chance of
getting away from the Saxons and possibly keeping the chariots in the game
if they managed to rally. As it was, the charge of four chariots against 32
Saxons was predictably a massacre: my chariots were summarily dealt with and
the lone survivor chased down and killed in the next turn:
<-- insert map here -->
While the chariots were meeting their bumpy end on the right flank, the game
defining charge and subsequent melee was taking place in the center. The
Malini, one of the regular warband units, and Bartolomix himself charged the
32 man warband unit in front of them. This was very much a make or break
charge. With the fanatics out on the left flank trying to maneuver on the
flank of the third Saxon warband, I needed some other hammerblow to knock
out a Saxon unit -- hence the charge of warband and general. If I would be
able to win the combat, the Gauls would autobreak the Saxons and things
would start looking very good indeed. To make things more interesting,
Bartolomix challenged the opposing 2 handed axe wielding character.
Well, it turned out to be a frustating round of combat. To begin with,
Bartolomix, although outclassing the Saxon wild man on stats, managed to
only score one wound (which was saved) and had to endure the ignominy of
receiving a wound in return (that did not save). The rest of the warband (7
attacks with rerolls of misses - HatPW mixed weapons rule) only managed to
score one extra wound. So 2 wounds to the Celts. Not very good. Luckily, the
Saxons only scored 2 wounds as well (appaling dice rolling on both sides),
and with equal numbers of ranks (4) and standard bearers (1) on both sides,
it came down to a musician roll-off: a battle of the horns (carnyx vs
hollowed out piece of cow). Tension mounted as the dice tumbled ... drat ...
a Gallic one to the Saxon five. A lost combat and the chance of breaking the
Saxon warband was gone for good.
<-- insert map here -->
The Saxon reply in their round of combat saw a massive difference in wounds
inflicted - my 2 versus the Saxon 9 or so, resulting in both the Gallic
warband and Bartolomix breaking from the combat. To add injury to insult,
Bartolomix tripped over his cloak while running and was caught by the
pursuing Saxons. Cue one dead general and a general panic test for the
Gallic army. Luckily, my two intact units (the other warband and the
fanatics) held their morale, although the rest of the army was now fleeing
back to the roundhouse.
Thursday, 16 March 2006
Battlegames
I received the first issue of Battlegames this week (wesbite).
I have to say I'm pleasantly surprised. There is a lot of gaming content in the magazine, and it was very enjoyable to read. If you consider subscribing to a magazine, I can recommend Battlegames.
I have to say I'm pleasantly surprised. There is a lot of gaming content in the magazine, and it was very enjoyable to read. If you consider subscribing to a magazine, I can recommend Battlegames.
Wednesday, 15 March 2006
All Quiet on The Western Front revisited
Tuesday March 14 saw the 3rd game in the now highly succesful (ahem, shameless self-promotion) series of "Games in Phil's Attic".
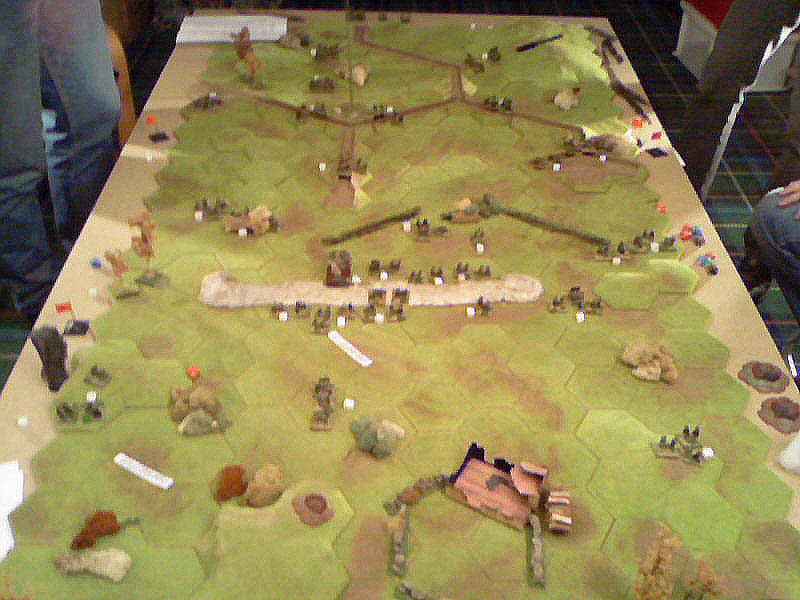
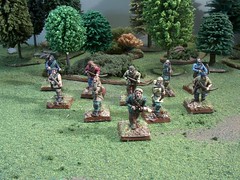
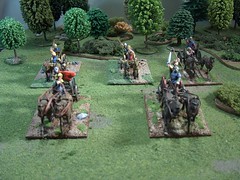
The theme this time was the Western front during WW1. The Germans had to attack a British trench system. Due to the fact that I have far less British than German figures, the Germans always end up being the attacker.
The map was laid out such that would be a 'defence in depth' scenario. The main attack direction was along the length of the table to allow for this. To simulate this defence in depth idea, the British deployment was such that a minimum number of units had to be in the frontal zone, but the bulk was in the rear zone, where the main trenches were located. Unknown to the Germans, the British also had the availability of barbed wire sections and minefields which they could deploy anywhere.
The Germans had to divide their force in 3 Stosstruppen, and each Stosstrupp was assigned a particular attacking axis. Units could not leave their sector, thereby simulating the idea of 3 formations attacking in parallell, but each in their own sector of the battlefield. We called this the 'German Doctrine'.
The game was spiced up by random events, ranging from infantry reinforcements, morale boosts, airplanes, an A7V tank, off-board artillery, etc.
Frank en Koen took the German side, Eddy and Bart played the British. Initially, the German advance went well. The frontal sentry units of the Tommies were wiped out fast. When reaching the 2nd line (this was the first trench), the advance halted for a moment, but in the end, the British vacated this position as well (British mortars seem to have problems hitting anything) to fall back to their third line. This third line (and full trnech system) was reinforced by troops coming from the back (and due to lucky random events).
The losses on the German side started to pile up, but the impetus of the attack was still strong. In the mean time, an A7V tank had entered the battlefield, and despite rumours of tanks not working, it kept pushing forward, refusing to malfunction. Also, an Albatros bomber had also appeared to help the infantry assaults underneath.
The German infantry managed to infiltrate the final trenches, but resistance was very stiff. However, by that time, it was after midnight, and we decided to stop the game. Some discussion followed about who would have won, but fairest thing to say is that it still could have gone either way. By looking at the random events still left, the British would still receive quite a few new reinforcements, but the Germans still had their field guns intact, with which they could keep hammering the British Infantry from a distance.
So, in the end, it went just as in WW1: lots of casualties on both sides, , and no-one really was sure who had won in the end. But gamewise, it was a lot of fun!
Here's a not so sharp picture. I just bought a new GSM, and apparantly, I don't know how to work the camera properly yet ...
Tuesday, 7 March 2006
My Celtic army
Those of you following this blog know that we're currently involved in a [WAB Escalation Campaign](http://www.nirya.be/snv/sections/WEC), where the armies grow from 500 points in size to a large size over the course of the campaign. We're currently in [Round 4](http://www.nirya.be/snv/sections/WEC/turn4.html), where the nominal point size would be 1250 (we've been working with increments of 250 points), but we're allowing a range of 1000 - 2000 points to account for different painting speeds of the various players.
I'm on the slower side of the painting speed distribution, and my Celtic army has only just reached 1000 points (minus four models, but who's counting :) ?). This entry is a photo introduction of this army.
Without further ado, here's Bartolomix' warband. You can find these pictures in [their own set on my Flickr account](http://www.flickr.com/photos/robartes/sets/72057594075245680/) as well as here below.

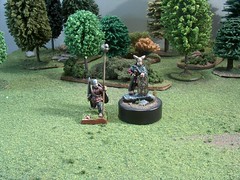
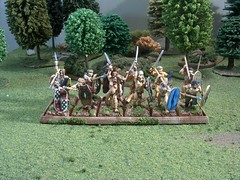
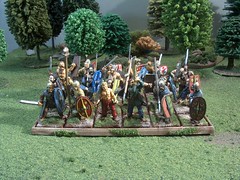
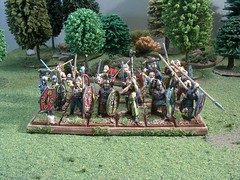
On to the next 1000 points. At 5 points per warrior, that's only 200 more.
I'm on the slower side of the painting speed distribution, and my Celtic army has only just reached 1000 points (minus four models, but who's counting :) ?). This entry is a photo introduction of this army.
Without further ado, here's Bartolomix' warband. You can find these pictures in [their own set on my Flickr account](http://www.flickr.com/photos/robartes/sets/72057594075245680/) as well as here below.
On to the next 1000 points. At 5 points per warrior, that's only 200 more
Monday, 6 March 2006
Red Barons
Saturday March 4 the yearly Red Barons convention took place in Gentbrugge. Schild en Vriend took part with a display of our Arnhem game (see other posts in this blog). Although there were some vague plans of actually playing a game we never really got farther than setting up the boards and putting some units in more or less historical positions. Bart and I mostly chatted with various people, browsed the trade stands and had a good time, all without the stress of actually having to run a game.
There were a few good games going on, some being repeats from Crisis (e.g. the Ancient Naval attack on a Fortress run by La Grande Armee). TSA had an Afriboria game featuring characters from the TinTin novels. Quite original.
There was also a Zombie-game with 3D paper scenery, which was also quite good w.r.t. visual appeal.
Other games were more standard in nature, and of course there were various GW games as well.
As for buying, I got the Commands & Colors Ancient game, 2 blisters with fantasy figures from Chiltern and some trees from Woodland Scenics. Not that I really need these last 2 items, but I felt I had to buy at least something to support the industry ;-)
Nevertheless, I really had to scrounge to find some things I wanted to buy. I'm always eager to spend some money at conventions, but I felt the choices this year were very limited. In my opinion, the RB convention is just above the level at which it becomes interesting to attend as a casual visitor (that is, not being involved in any of the club-games) in the hopes of finding some good items. Now, this may be the fate of any small-scale convention, so let's see what next year brings.
Sunday, 5 March 2006
Leipzig revisited
Regular readers with their memories in overdrive might remember my report of last year's Big Game, organised by our old friend Adrian and his chums from Cheltenham. That saw a glorious French defence of Leipzig, 1813, ahem. I played, by the way, Napoleon.
This year, Adrian went one better and organised a very amusing campaign game, played by e-mail, which culminated in big battles on the tabletop, played out in rural Gloucestershire. I had the role of Napoleon again, ably assisted by (the sometimes querolous) Marshall 'Alisdair' Ney and the Royal Saxons, faithfully led by David. Against us was ranged a huge array of opponents, James, Kieron and Orhan playing the Russians and Prussians. The scenario was the Allied invasion of Germany in 1813 and Napoleon's riposte.
The email game was played out over several turns, with communication forbidden between players unless they were in the same place on the map. This led to inevitable confusion and some stress (in gaming terms), with Commanders out of touch with each other and unable to trace each other. GM Adrian provided us with amazing game reports and sketch maps.
For those interested in the mechanics, a crucial aspect of the game was an initial choice of strategy. You had ten strategy points to allocate between five different aspects of the army: cavalry strength, infantry,artillery, scouting and logistics (including map movement). As Napoleon, I decided to maximise scouting and logistics with the aim of using this to get our troops into the right place to achieve local superiority. I think that in the end, it was a fair strategy, as the map movement ended with the following situation: the Russians slipped into Leipzig, with Prussians supporting from the North. More Russians were to the South, trying to reinforce their heavily pressured friends. Hot on their heels from the East were my French, Poles and Saxons.
Acdrian assembled the team to play out two massive battles on a 20' by 4' table in the (warm and freshly painted) garden shed at Andy's house in an obscure (but pleasant) village somewhere in South West England. As I was driven their and back by various members of the group, I never really worked out where I was. Though I think it is the cake making centre of England, judging by the vast quantities of cake and fudge provided by Andy's wife.
I won't bore everyone with the full story of the games. On Saturday, we fought out three battles on one table, with a mass assault of the Poles on Leipzig causing big casualties on the Prussians but faling ultimately to capture the city. A simultaneous scrap between the French and battered Russians, a bit further south, was notable principally for Kieron's confused but heroic Cossacks:
Champagne Moment
Originally uploaded by ahuyton.
And my horse artillery that routed a large part of Moscow's finest:
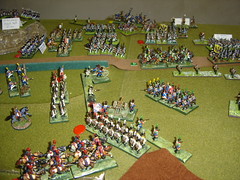
Gloating
Originally uploaded by ahuyton.
For his feats with the Cossacks, that consisted of holding a hill against an entire French Division, Kieron deseredly won the Hero of the Match Award.
Day two was different. Simultaneously with the three scraps going on near Leipzig, was a massive battle further south, with each side having about 15 regiments of Cavalry. The French had some unexpected success:
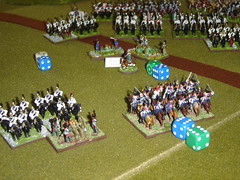
An unlikely win for the French cavalry
Originally uploaded by ahuyton.
The stress...
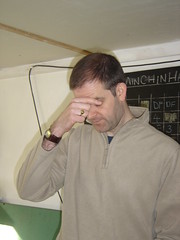
Oh dear
Originally uploaded by ahuyton.
Again, poor Kieron's Russians took a pasting, this time with the French imperial guard lending a hand. But David's Saxons bravely held the left flank against the Russian Guard, who notoriously were lost by their Commander in the campaign game.
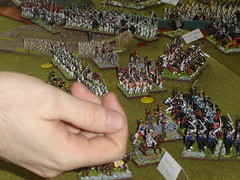
The Hand of God?
Originally uploaded by ahuyton.
In the centre, a massive cavalry meleee, finally indecisive, but not without moments of amusement (see photos!).
A good weekend, despite Adrian's (very reasonable) ruling that the French didn't uite do enough to win the day. By the way, we played using the shako rules, which play well and smoothly, are great fun and give a good feel. Definitely the best Napoleonic rules around.
The good news though is that Adrian is already talking of another game next year. Great!
This year, Adrian went one better and organised a very amusing campaign game, played by e-mail, which culminated in big battles on the tabletop, played out in rural Gloucestershire. I had the role of Napoleon again, ably assisted by (the sometimes querolous) Marshall 'Alisdair' Ney and the Royal Saxons, faithfully led by David. Against us was ranged a huge array of opponents, James, Kieron and Orhan playing the Russians and Prussians. The scenario was the Allied invasion of Germany in 1813 and Napoleon's riposte.
The email game was played out over several turns, with communication forbidden between players unless they were in the same place on the map. This led to inevitable confusion and some stress (in gaming terms), with Commanders out of touch with each other and unable to trace each other. GM Adrian provided us with amazing game reports and sketch maps.
For those interested in the mechanics, a crucial aspect of the game was an initial choice of strategy. You had ten strategy points to allocate between five different aspects of the army: cavalry strength, infantry,artillery, scouting and logistics (including map movement). As Napoleon, I decided to maximise scouting and logistics with the aim of using this to get our troops into the right place to achieve local superiority. I think that in the end, it was a fair strategy, as the map movement ended with the following situation: the Russians slipped into Leipzig, with Prussians supporting from the North. More Russians were to the South, trying to reinforce their heavily pressured friends. Hot on their heels from the East were my French, Poles and Saxons.
Acdrian assembled the team to play out two massive battles on a 20' by 4' table in the (warm and freshly painted) garden shed at Andy's house in an obscure (but pleasant) village somewhere in South West England. As I was driven their and back by various members of the group, I never really worked out where I was. Though I think it is the cake making centre of England, judging by the vast quantities of cake and fudge provided by Andy's wife.
I won't bore everyone with the full story of the games. On Saturday, we fought out three battles on one table, with a mass assault of the Poles on Leipzig causing big casualties on the Prussians but faling ultimately to capture the city. A simultaneous scrap between the French and battered Russians, a bit further south, was notable principally for Kieron's confused but heroic Cossacks:
Champagne Moment
Originally uploaded by ahuyton.
And my horse artillery that routed a large part of Moscow's finest:
Gloating
Originally uploaded by ahuyton.
For his feats with the Cossacks, that consisted of holding a hill against an entire French Division, Kieron deseredly won the Hero of the Match Award.
Day two was different. Simultaneously with the three scraps going on near Leipzig, was a massive battle further south, with each side having about 15 regiments of Cavalry. The French had some unexpected success:
An unlikely win for the French cavalry
Originally uploaded by ahuyton.
The stress...
Oh dear
Originally uploaded by ahuyton.
Again, poor Kieron's Russians took a pasting, this time with the French imperial guard lending a hand. But David's Saxons bravely held the left flank against the Russian Guard, who notoriously were lost by their Commander in the campaign game.
The Hand of God?
Originally uploaded by ahuyton.
In the centre, a massive cavalry meleee, finally indecisive, but not without moments of amusement (see photos!).
A good weekend, despite Adrian's (very reasonable) ruling that the French didn't uite do enough to win the day. By the way, we played using the shako rules, which play well and smoothly, are great fun and give a good feel. Definitely the best Napoleonic rules around.
The good news though is that Adrian is already talking of another game next year. Great!
Subscribe to:
Posts (Atom)