Yes, this blog has been a bit neglected of late (more on that later). That also means that it accumulated _a lot_ of junk comments (8477 or so) which would have meant a lot of point and clicking to remove it.
Luckily, [Dreamhost](http://www.dreamhost.com) gives one command line access to everything, including the mysql database behind TTM, so I went in and took out all of the comments after the latest legit one in one fell swoop. A few seconds work instead of a few days. Sometimes, being a bit of a geek is fun.
As to the reason there's not much happening around here (apart from Phil, thank god for that) is that I've been in a bit of a wargaming funk since Easter or so. I haven't painted or done anything wargame related, except play a few games. It's one of those phases. Trust me, it will pick up again.

Wednesday, 25 July 2007
Tuesday, 24 July 2007
Miniature Wargaming Podcast
Recently, I have been looking for a podcast related to miniature wargaming. The advantage is that one can listen to wargaming-related news and stories while driving the car, or even when painting.
After some search, I found the following, which I think is very good. The hosts have a pleasant style of presenting, and the topics are varied and well-researched. Their sense of humour is also to my liking, so that's a bonus!
http://allaboutminiatures.libsyn.com/
After some search, I found the following, which I think is very good. The hosts have a pleasant style of presenting, and the topics are varied and well-researched. Their sense of humour is also to my liking, so that's a bonus!
http://allaboutminiatures.libsyn.com/
Thursday, 5 July 2007
Wargaming in style
Below is a clip from a British tv-series from the early 70s (I assume), "Callan". Watch the whole sequence: 2 gentlemen playing a wargame in a spacious wargaming room.
Sunday, 29 April 2007
ACW - Battle of Kolb's Farm
Two years ago I bought a load of 6mm Adler figures of our good friend BD, who in turn had bought them off JP (we address each other in simple terms here in Belgium). In that time, I painted up a few more regiments, made a little farm model and generally prepared for the Big Day when the figures would see battle. This happy moment occurred last Friday when a small group of us gathered in the sauna like atmosphere of GW's top floor gaming room to play a game using the Principles of War rules.
First a word about the rules. It is an elegant system, with an army list of units (you can choose what operational scale to play at - it makes no difference to the rules), each of which has a numerical rating (generally from 6 to 18) which represents its combat factor and morale factor. Weapons and doctrine may also be noted against the unit, defining what may be done by way of maneouvre, melee, firing range, etc. To give you an idea of how the game works, a volley of rifle fire from an average unit will do 1 or 2 hits at close range - thus the unhappy target unit may have a starting factor of 12 and this will go down to 10 if it is takes 2 hits. This is recorded on the unit roster. Every time hits are inflicted the victim unit must take a morale test. He rolls a D20 and if the score is equal or lower than the current roster score (in our example earlier it was 10) then the unit passes the test. If more, then the unit is shaken, if doubled, the unit retires, if trebled it flees from the game in disgust. So as the game goes on, attrition wears down a unit and at some stage it will break. There are of course modifiers, for example if a general is nearby, if you are hit in the flank. Important note - don't roll a 20 when testing morale, this automatically gives a result one level worse than would otherwise be the case.
Movement is simple and always has to be in conformity with the orders set for the unit. The distance you can move depends on the quality of your officer - the mechanic is a die roll per officer (who commands 3+ units, typically) and that is the number of units to move.
You get a D4 id a lousy officer, a D6 if normal or an average die if good.
Now I have bored you enough with the rules. The scenario is an action from 1864, a desperate attack by the Confederates against a flanking movement by Hooker's Union troops. I took it from the 'Charge' magazine on Magweb. Each side has roughly 20 units of infantry, with a big advantage for the Union in terms of artillery. I decided to give a couple of units of cavalry to the Confederates, even if historically they weren't on the field. why? I had painted them and wanted them see action and just to give the rebels a bit of a chance in what would be a stern ask.
The terrain is dominated by a three creeks that run from the confederate right to the centre of the table, where there is much marshy ground and a cornfield. On the left are woods all along the edge plus Kolb's farm halfway across the table. A road runs from the Confederate centre to the Union right. Each side is ordered to capture both ends of the road.
The Union plan is simple but effective, a concentration of their forces before the farm and across the table to the other side of the cornfield, leaving their left flank open. They are also allowed to place an ambush in the woods.
The Confederates split their forces. Two infantry brigades on the far right with orders to undertake a huge Napoleon style flanking move. Two brigades on the left with orders to capture Kolb's farm. The cavalry hold the centre. A solitary smoothbore artillery piece is to give support to the left flank.
With typical GW cunning, rather than use his Kentucky ambushers under Colonel Gallop, he asks me (in my GM role, though I am also playing the Confederate left due to the unfortunate but can't be helped absence of one of our players) if he can give orders to them and move them. Blithely I agree. From a Rebel viewpoint this is an error, as Gallop races out of the words to occupy the farm before I can get there. Damn.
On my turn, I march as fast as I can towards the farm, determined to take it. My supporting brigade finds a Grand battery in front of it and forms a firing line, spending much of the game firing at long range into the Union artillery causing sporadic casualties but not having much impact.
The story of the game is simple. A massive scrap for the farm, won by the Blues, thanks to their getting there first and taking advantage of the cover. I didn't help myself by entering into melee rather impetously and then rolling a couple of '20's on the dice at inopportune moments. Gradually I was worn down and one brigade eliminated. On the confederate right, progress was too slow and though eventually a firing line against the Union left was established no coordinated attack was possible. Our cavalry, alas, suffered indecision and did nothing the entire game.
At about Midnight, with the Union advancing on all sides, my troops surrounded and hopes on the right flank in tatters, we fled back to Atlanta leaving the now battered and burnt Kolb's Farm to a happy Union pair of players (Graham W and Graham K).
A very good game, very enjoyable and a final result very similar to the historical one - the confederates made frontal charges across the front, stalled in the marshes and were massacred. I definitely want to play with these splendid little troops again, so nicely painted by JP.
ACW - Battle of Kolb's Farm
Two years ago I bought a load of 6mm Adler figures of our good friend BD, who in turn had bought them off JP (we address each other in simple terms here in Belgium). In that time, I painted up a few more regiments, made a little farm model and generally prepared for the Big Day when the figures would see battle. This happy moment occurred last Friday when a small group of us gathered in the sauna like atmosphere of GW's top floor gaming room to play a game using the Principles of War rules.
First a word about the rules. It is an elegant system, with an army list of units (you can choose what operational scale to play at - it makes no difference to the rules), each of which has a numerical rating (generally from 6 to 18) which represents its combat factor and morale factor. Weapons and doctrine may also be noted against the unit, defining what may be done by way of maneouvre, melee, firing range, etc. To give you an idea of how the game works, a volley of rifle fire from an average unit will do 1 or 2 hits at close range - thus the unhappy target unit may have a starting factor of 12 and this will go down to 10 if it is takes 2 hits. This is recorded on the unit roster. Every time hits are inflicted the victim unit must take a morale test. He rolls a D20 and if the score is equal or lower than the current roster score (in our example earlier it was 10) then the unit passes the test. If more, then the unit is shaken, if doubled, the unit retires, if trebled it flees from the game in disgust. So as the game goes on, attrition wears down a unit and at some stage it will break. There are of course modifiers, for example if a general is nearby, if you are hit in the flank. Important note - don't roll a 20 when testing morale, this automatically gives a result one level worse than would otherwise be the case.
Movement is simple and always has to be in conformity with the orders set for the unit. The distance you can move depends on the quality of your officer - the mechanic is a die roll per officer (who commands 3+ units, typically) and that is the number of units to move.
You get a D4 id a lousy officer, a D6 if normal or an average die if good.
Now I have bored you enough with the rules. The scenario is an action from 1864, a desperate attack by the Confederates against a flanking movement by Hooker's Union troops. I took it from the 'Charge' magazine on Magweb. Each side has roughly 20 units of infantry, with a big advantage for the Union in terms of artillery. I decided to give a couple of units of cavalry to the Confederates, even if historically they weren't on the field. why? I had painted them and wanted them see action and just to give the rebels a bit of a chance in what would be a stern ask.
The terrain is dominated by a three creeks that run from the confederate right to the centre of the table, where there is much marshy ground and a cornfield. On the left are woods all along the edge plus Kolb's farm halfway across the table. A road runs from the Confederate centre to the Union right. Each side is ordered to capture both ends of the road.
The Union plan is simple but effective, a concentration of their forces before the farm and across the table to the other side of the cornfield, leaving their left flank open. They are also allowed to place an ambush in the woods.
The Confederates split their forces. Two infantry brigades on the far right with orders to undertake a huge Napoleon style flanking move. Two brigades on the left with orders to capture Kolb's farm. The cavalry hold the centre. A solitary smoothbore artillery piece is to give support to the left flank.
With typical GW cunning, rather than use his Kentucky ambushers under Colonel Gallop, he asks me (in my GM role, though I am also playing the Confederate left due to the unfortunate but can't be helped absence of one of our players) if he can give orders to them and move them. Blithely I agree. From a Rebel viewpoint this is an error, as Gallop races out of the words to occupy the farm before I can get there. Damn.
DSC00945_edited
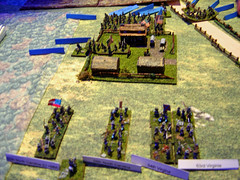
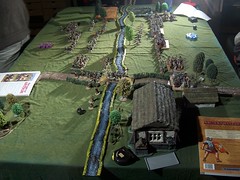
Above: the rebel columns attack Kolb's Farm
On my turn, I march as fast as I can towards the farm, determined to take it. My supporting brigade finds a Grand battery in front of it and forms a firing line, spending much of the game firing at long range into the Union artillery causing sporadic casualties but not having much impact.
The story of the game is simple. A massive scrap for the farm, won by the Blues, thanks to their getting there first and taking advantage of the cover. I didn't help myself by entering into melee rather impetously and then rolling a couple of '20's on the dice at inopportune moments.
DSC00949
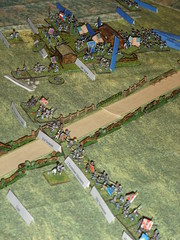
Above: storm over the farm, and the confederate firing line.
Gradually I was worn down and one brigade eliminated.
DSC00950
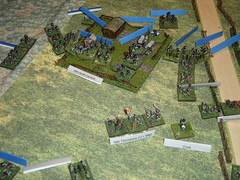
Above: last desperate attack by the Rebels, they are destined to be massacred.
On the confederate right, progress was too slow and though eventually a firing line against the Union left was established no coordinated attack was possible. Our cavalry, alas, suffered indecision and did nothing the entire game.
DSC00951
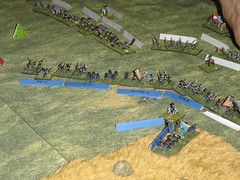
Above: The Union left holds up the Rebel attack
At about Midnight, with the Union advancing on all sides, my troops surrounded and hopes on the right flank in tatters, we fled back to Atlanta leaving the now battered and burnt Kolb's Farm to a happy Union pair of players (Graham W and Graham K).
A very good game, very enjoyable and a final result very similar to the historical one - the confederates made frontal charges across the front, stalled in the marshes and were massacred. I definitely want to play with these splendid little troops again, so nicely painted by JP.
First a word about the rules. It is an elegant system, with an army list of units (you can choose what operational scale to play at - it makes no difference to the rules), each of which has a numerical rating (generally from 6 to 18) which represents its combat factor and morale factor. Weapons and doctrine may also be noted against the unit, defining what may be done by way of maneouvre, melee, firing range, etc. To give you an idea of how the game works, a volley of rifle fire from an average unit will do 1 or 2 hits at close range - thus the unhappy target unit may have a starting factor of 12 and this will go down to 10 if it is takes 2 hits. This is recorded on the unit roster. Every time hits are inflicted the victim unit must take a morale test. He rolls a D20 and if the score is equal or lower than the current roster score (in our example earlier it was 10) then the unit passes the test. If more, then the unit is shaken, if doubled, the unit retires, if trebled it flees from the game in disgust. So as the game goes on, attrition wears down a unit and at some stage it will break. There are of course modifiers, for example if a general is nearby, if you are hit in the flank. Important note - don't roll a 20 when testing morale, this automatically gives a result one level worse than would otherwise be the case.
Movement is simple and always has to be in conformity with the orders set for the unit. The distance you can move depends on the quality of your officer - the mechanic is a die roll per officer (who commands 3+ units, typically) and that is the number of units to move.
You get a D4 id a lousy officer, a D6 if normal or an average die if good.
Now I have bored you enough with the rules. The scenario is an action from 1864, a desperate attack by the Confederates against a flanking movement by Hooker's Union troops. I took it from the 'Charge' magazine on Magweb. Each side has roughly 20 units of infantry, with a big advantage for the Union in terms of artillery. I decided to give a couple of units of cavalry to the Confederates, even if historically they weren't on the field. why? I had painted them and wanted them see action and just to give the rebels a bit of a chance in what would be a stern ask.
The terrain is dominated by a three creeks that run from the confederate right to the centre of the table, where there is much marshy ground and a cornfield. On the left are woods all along the edge plus Kolb's farm halfway across the table. A road runs from the Confederate centre to the Union right. Each side is ordered to capture both ends of the road.
The Union plan is simple but effective, a concentration of their forces before the farm and across the table to the other side of the cornfield, leaving their left flank open. They are also allowed to place an ambush in the woods.
The Confederates split their forces. Two infantry brigades on the far right with orders to undertake a huge Napoleon style flanking move. Two brigades on the left with orders to capture Kolb's farm. The cavalry hold the centre. A solitary smoothbore artillery piece is to give support to the left flank.
With typical GW cunning, rather than use his Kentucky ambushers under Colonel Gallop, he asks me (in my GM role, though I am also playing the Confederate left due to the unfortunate but can't be helped absence of one of our players) if he can give orders to them and move them. Blithely I agree. From a Rebel viewpoint this is an error, as Gallop races out of the words to occupy the farm before I can get there. Damn.
DSC00945_edited
Above: the rebel columns attack Kolb's Farm
On my turn, I march as fast as I can towards the farm, determined to take it. My supporting brigade finds a Grand battery in front of it and forms a firing line, spending much of the game firing at long range into the Union artillery causing sporadic casualties but not having much impact.
The story of the game is simple. A massive scrap for the farm, won by the Blues, thanks to their getting there first and taking advantage of the cover. I didn't help myself by entering into melee rather impetously and then rolling a couple of '20's on the dice at inopportune moments.
DSC00949
Above: storm over the farm, and the confederate firing line.
Gradually I was worn down and one brigade eliminated.
DSC00950
Above: last desperate attack by the Rebels, they are destined to be massacred.
On the confederate right, progress was too slow and though eventually a firing line against the Union left was established no coordinated attack was possible. Our cavalry, alas, suffered indecision and did nothing the entire game.
DSC00951
Above: The Union left holds up the Rebel attack
At about Midnight, with the Union advancing on all sides, my troops surrounded and hopes on the right flank in tatters, we fled back to Atlanta leaving the now battered and burnt Kolb's Farm to a happy Union pair of players (Graham W and Graham K).
A very good game, very enjoyable and a final result very similar to the historical one - the confederates made frontal charges across the front, stalled in the marshes and were massacred. I definitely want to play with these splendid little troops again, so nicely painted by JP.
Tuesday, 17 April 2007
Romano British slingers
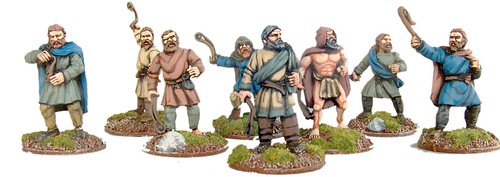
These are of course the [ex Pictish ones](http://www.nirya.be/snv/ttm/archives/000268.html), now painted.
These took me a bit longer than an hour apiece, for the simple reason that I lost momentum halfway through painting them (sick children and sick self), and it seems it is difficult to pick up again. Also, when I started painting them again, I slipped back in to 'full on' painting mode instead of my fast painting mode. I caught it quickly however :).
Next up are some command figures for my Romano British cavalry units that are still without.
Monday, 9 April 2007
Recent books read
I thought I'd bore you all by recounting some of the recent books I've finished, which might be of interest to all right thinking wargamers.
First, S M Stirling's excellent post-apocalyptic trilogy set in Oregon, which tells the tale of a world where suddenly one day electricity, gunpowder and other similar technologies stop working. Catastrophe follows but, happily for the wargaming enthusiast, small groups survive and start to find ways of coping with a world riddled by plague, cannibals and bandits. In fact, the three books tell the story of enterprising individuals who start to develop societies, gather resources, learn technologies, fight evil etc etc. I won't go into detail, because that would ruin what is in fact a well told tale. Anyone who has played Age of Empires, or a good build and conquer pbm game will enjoy this. It is well written and much less right wing and dogmatic than some of his books. And the title? 'Dies the Fire'.
Second, very different, a fascinating account of the Long Range Desert Group's activities, 'Providence their Guide' by David Lloyd Owen, who become the big chief of the group. Well written and enthralling, I learned a lot about the LRDG in the North African campaign and also, which I confess that I didn't know, their activities in Albania and Yugoslavia once Rommel had fled and left the Afrika Korps to abject surrender. I bought my copy from the amazing military bookshop in Erpe, De Krijger, but I'm sure you can find a copy on Abebooks.
Last, assuming you're not interested in the various detective novels that have been consuming my limited time on this earth, is a very amusing autobiography of a (very British) wargamer, Harry Pearson, called 'Achtung Schweinehund'. Great, but I wonder how well it translates to other cultures. It is very much a story of English childhood in the 1960s and 1970s and its repercussions on apparent adulthood later on in life. Hilariously funny in places, stridently dogmatic in others but what of course wins the day is a mention of our one and 'own' (I say this as an ex-pat who struggles daily with the Dutch language) 'Crisis' convention and the glory days of Bart's Schild en Vriend club. Definitely recommended to English readers of a certain age. Maybe it helps others understand the oddities of that race and generation?
Sunday, 8 April 2007
A Saxon Raid
Bart and I met up in his fine wargaming attic to put our Warhammer Ancients armies into action again. We're both convinced that the new 'Age of Arthur' is one of the best gaming source books and inspirations around.
For his part, Bart has a splendid Arthurian army, led by Comes Bartholomeus Grassus, new Count of Britain (following the glorious exploits of his ancestors in darkest Germany) and foreshadowing great adventures of his successors in the distant future. Facing him are my Saxons, a little Alfredian in character it has to be said, but now at full strength (ie painted and based).
Bart set up a scenario from the source book, a Saxon raid on a British village (featuring Bart's very nice hillfort). Basically on the right side of the table is a village in a corner, leaving that are three carts of plunder that have to exit the other side of the table without being intercepted by the British. Defending them is the mass of the Saxon army.
I won't bore you with a blow by blow account of the battle. Basically, the Saxons set up a battleline with their elite armoured troops on the left, two massive units of Ceorls (peasants with spear and shield) on the right and some skirmishers in front. My 'plan' was to rush the baggage off table while attacking with my heavy infantry and holding with the rest.
Regrettably, Bart had a much better plan. He rushed his two cavalry units to my left (to where the baggage are racing) and quickly launched a dashing attack into my flank, sweeping away both my best unit and the King's brother, attached to them. On my right, a melee between my Ceorls and a unit of Arthurian spearmen was a bloody grind, my men holding out unexpectedly well.
Regrettably, Bart had in reserve some very good quality spearmen units which he proceeded to throw into the battle. They swept away my other unit of Ceorls and the subsequent rout led to my entire army panicking and running.
Yet another defeat for the Saxons. Well Rosemary Sutcliffe (author of the best Arthurian novels available) would be happy, I suppose.
Monday, 26 March 2007
The story of the (now) British archers
So you know that I planned [transforming some Pictish archers to Romano British ones](http://www.nirya.be/snv/ttm/archives/000266.html). Well, it's done now, they're dressed in green stuff. This is them before:

and after:

As you can see, I left one of them in his loincloth, just because there's a nutter in every army. There's also quite a lot of left over green stuff spread around the bases. It always amazes me how little of the stuff you actually need. Basically, take the smallest estimate of what you think you are going to need, and then mix up half that. You'll still have some left over.
Total conversion time was around 3 hours, so a bit longer that I expected, but I like the result. Now let's see how they paint up -- they're off to get some mold lines (and one 'shield knob' I forgot to snip off) removed before they go into the spray booth (aka the great outdoors).
and after:
As you can see, I left one of them in his loincloth, just because there's a nutter in every army. There's also quite a lot of left over green stuff spread around the bases. It always amazes me how little of the stuff you actually need. Basically, take the smallest estimate of what you think you are going to need, and then mix up half that. You'll still have some left over.
Total conversion time was around 3 hours, so a bit longer that I expected, but I like the result. Now let's see how they paint up -- they're off to get some mold lines (and one 'shield knob' I forgot to snip off) removed before they go into the spray booth (aka the great outdoors).
Thursday, 22 March 2007
Celtic archers
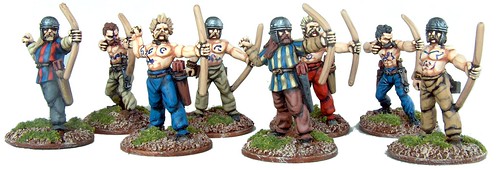
These are Renegade figures. The painting time was again around an hour per figure. The tattoos were done with a gel pen (thanks for the tip, Koen DS).
Wednesday, 21 March 2007
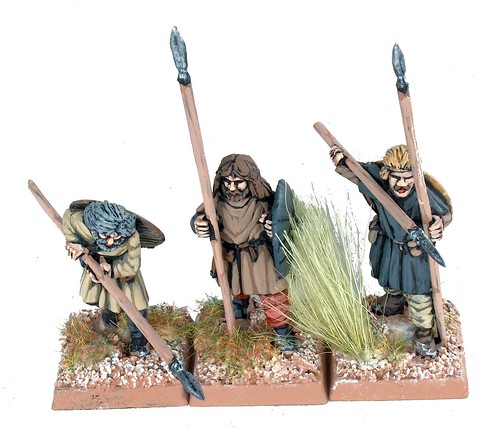
The story of the Pictish slingers
At the Red Barons convention a few weeks ago, where the Mons shop guy was selling off his remaining stock for 50%, I bought a pack of 8 [Black Tree Design](http://www.black-tree-design.com/) Pictish Slingers. I have been toying with the idea of building a 5th - 6th century CE Pictish army (Age of Arthur period), and those would fit right in, I thought.
Of course, when checking the book, it seems the Picts did not employ slingers, only javelinmen, bowmen and the nebulous crossbowmen. So plan B is to use them as slingers in my Arthurian army. Unfortunately, the slingers are dressed in Pictish fashion (obviously), wearing just a tunic and no trousers or shoes, and in the case of two of the figures in a loincloth and cloak only. This would not do for a (semi) civilised Romano British force. So, before painting the little buggers, I'm 'dressing' them with green stuff. Six of the figures need trousers and shoes, and two need those and a tunic.
As I'm typing this, I have finished two and a half conversions (two pairs of trousers, two pairs of shoes and one tunic) and although this is by far my most ambitious conversion project so far, I'm fairly happy with the results so far. Photos to follow when the conversions are done.
As an aside, the painting queue is now the Pictish slingers, then a Romano British cavalry command group (leader, standard bearer, musician), then 10 ACW Zouaves (which I'll paint up as Louisiana Tigers for Ebay), and after that, we'll see. The Celtic archers that were on the queue before the slingers are done and are awaiting photographs.
Sunday, 18 March 2007
King Kong Pulp game
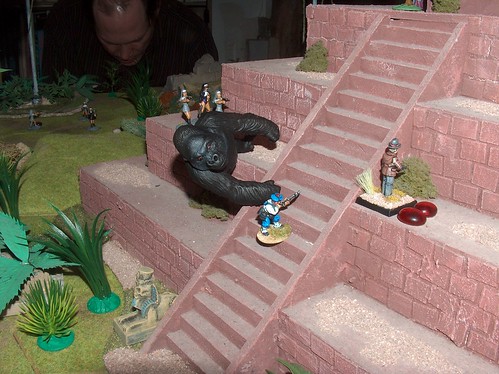
Last Tuesday we played a 'Pulp era' game over at Phil's Den of Lead Delights (read: his attic), of which pictures can be found here.
The rules we used were .45 Adventure by Rattrap Productions, and we played with some of Frank's new alternative WWII figures and some of my Darkest Africa figures (with one new one). Players were Frank, Koen, Phil, Eddy and myself.
The scenario involved the delightful Elizabeth, assistant to the archeological team running around the jungle, mysteriously being abducted to a sinister pyramid deep in the steamy jungles (just getting into the pulp lingo here, bear with me). The archeologists, two teams of figures, went out into the jungle to rescue the fair damsel, while a bunch of Nazis and nuns arrrived after them to get to Elizabeth themselves, for reasons that were never really clear.
I played one of the archeologists' teams, with 'Winston Churchill' as the professor, his assistant Arthur and four French marines, Jean Luc, Jean Francois, Jean Louis and Jean Marc. Eddy took the second archeologist team, while Frank and Koen played the (mostly female) Nazis and (entirely female -- we think) nuns respectively. The rest of this entry will be a report of the game from the viewpoint of my character.
Before the start of the game, umpire Phil had indicated that according to ancient legend and rumour, one needed three gems to successfully ascend the pyramid, of a fate worse than bears telling would befall the climber. These gems were to be found throughout the jungle, embedded as eyes in a variety of idols and statues. So item number one on the agenda for the good guys was to find these statues and collect three gems. Eddy and I decided to go part of the way together and then split up to take different paths through the jungle to the pyramid.
As it happened, the evil guys arrived on scene fairly quickly, and we (well, Eddy) decided on a change of plan: while Winston would forge on ahead, part of Eddy's party would try and delay the Nazis who were by then hot on the trail of the two adventurers. Meantime, the nuns took off into the jungle on a path of their own.
While Eddy was playing hide and seek (or rather, hide and be struck down in close combat), I discovered the first statue and duly cut out one of its eyes -- gem number one! However, right after getting gem number one, Jean Luc, our point man, discovered the dangers of the jungle first hand when a huge snake reared up from the undergrowth and bit him in the arm. In the end, it took two of Jean Luc's fellow Jeans to dispatch the slithery bugger (the snake, not Jean Luc).
Undeterred, either by slitherings in the bushes ahead or the cries of combat behind where Eddy was entertaining the nazis, we forged on to stumble upon a crowd of natives (well, three) in front of their hut. Not wanting to go into combat and losing time which we could not afford, I held aloft the gem from the statue and bellowed across the jungle 'Behold the Eye of Umbulumbuth'. That put the fear of, well, Umbulumbuth into the natives who promptly scattered into the jungle never to be seen again. Well done, methought.
And onwards to the jungle we go, taking out a tentacle (and presumably whatever was attached to said tentacle below the water) with a single well aimed shotgun blast (thank you, Arthur) and accepting the handover of a gem from one of Eddy's henchmen that had come running forward. Two gems collected!
At this point in the game, Eddy's delaying action had pretty much played out, with all of his figures in the delaying group being put out of action (something about a blademaster in the nazi camp), and the rest of the gems were out of reach or in the hands of the bad guys. After a mercifully short deliberation, we decided to take the 'legend says' part of 'get up the pyramid with three gems' with a good grain of salt and take our chances with only two.
So on we went to the pyramid, this time with Jean Francois leading the way. Of course, after successfully vaulting over a stream that turned out *not* to be fordable at a ford (thank you, umpire Phil), a rumble in the jungle just ahead of him turned out to be a huge herbivorous dinosaur, although Jean Francois might disagree with the plant eating bit, as the dino promptly took off one of his arms. However, fearless Winston, having paid attention in school, dug out the remains of his lunch and threw a healthy bit of lettuce downrange, momentarily distracting the big beastie and allowing the party to smartly bypass the behemoth and start the ascent of the pyramid.
And so it was done. While Arthur and two of the Jeans held off (well...) the increasing pressure of the nazi pursuers (who, together with the nuns, had 3 gems for themselves by now), Jean Francois and Winston climbed the steep steps to the top of the pyramid. It was then that they found out who kidnapped Elizabeth in the first place ... a big hairy ape, that was very big, sitting on top of the pyramid and was really big. Did I mention it was big? Anyway, undeterred, or rather being out of other options as well as lettuce by then, I bravely ventured further onto the pyramid. To my great relief, the ape seemed to be ignoring me (bad after shave?), though he did throw Jean Marc (who had had enough of the nazis) into a three a few miles away. After this however, a party of nuns arrived to entertain the monkey, and Jean Francois and Winston reached the top of the pyramid.
Thus we came to the crux of the evening, the pinnacle of excitement, yea even the climactic apotheosis, when Winston took his two gems and placed them in gem sized indentations in the altar Elisabeth was enchained on.... CLICK ... turns out that the old legends could'nt count. We won!
I had a blast with this game, even harking back to my roleplaying days (a long time ago when I was still wet behind the ears) at times (the natives and the lettuce ideas came from there). The rules proved a tad awkward at times (a bit too much math on occasion, even is it is just addition and subtraction), but they did get the job done. To be repeated, I'm sure.
Thursday, 15 March 2007
Saturday, 10 March 2007
More Romano British Spearmen
The last of the unit have been painted:
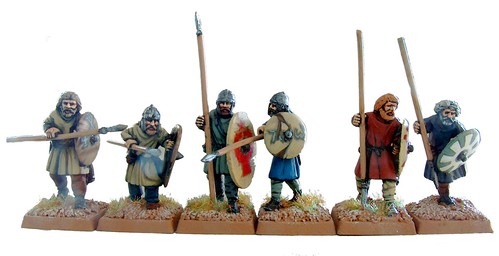
I timed the painting for these ones, and it still came out rather high to my likings. To paint these 6 figures, basing included, I needed 3 2 hour sessions, so 1 hour per figure. I still think I should be able to paint faster, and one way I can see this happening is using [LBM](http://www.littlebigmenstudios.com) transfers for the shields, which will probably save me 5 - 10 minutes per figure. It's not that my shield designs are so intricate that they take a long time , it's that a typical shield has around 4 - 5 different colour layers (basic colour in two or three layers and design in two layers, or decal and highlight layer) on it, and that is what takes the time.
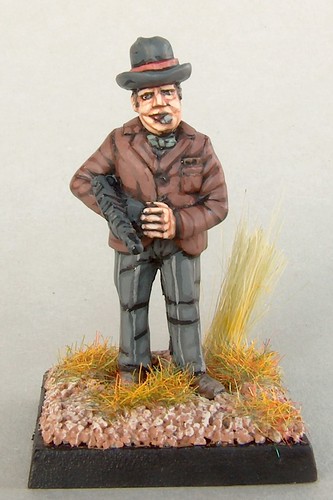
Next up to paint are a 1920's 'gangster' Churchill (actually, he's already painted, but needs some grass on the base before photographing) and 8 [Renegade](http://www.renegademiniatures.com) Celtic archers, which are primed and awaiting transfer to the painting table.
I timed the painting for these ones, and it still came out rather high to my likings. To paint these 6 figures, basing included, I needed 3 2 hour sessions, so 1 hour per figure. I still think I should be able to paint faster, and one way I can see this happening is using [LBM](http://www.littlebigmenstudios.com) transfers for the shields, which will probably save me 5 - 10 minutes per figure. It's not that my shield designs are so intricate that they take a long time , it's that a typical shield has around 4 - 5 different colour layers (basic colour in two or three layers and design in two layers, or decal and highlight layer) on it, and that is what takes the time.
Next up to paint are a 1920's 'gangster' Churchill (actually, he's already painted, but needs some grass on the base before photographing) and 8 [Renegade](http://www.renegademiniatures.com) Celtic archers, which are primed and awaiting transfer to the painting table.
Friday, 9 March 2007
WAB: Romano British annihilate invading Saxons
Tuesday (6 Feb 2007) Alan, Koen and myself played a WAB game, of which [pictures can be found here](http://www.flickr.com/photos/robartes/sets/72157594574928800/). This was our first battle using the new [Age of Arthur](http://www.warhammer-historical.com/arthur/arthur.asp) book, and featured my Romano British, commanded by Koen, defending a river crossing against Alan's invading Saxons. The scenario we used was the 'Battle on the River Glein' scenario from the book, also the first of Nennius' famous list of Arthur's 12 battles.
The scenario involves a passable river (half movement speed for crossing, defensible banks) with two crossing points -- a bridge and a ford -- across the length of the table, with some ancillary scenery left and right. The victor of the battle would be he that controlled both, or controlled one and contested another, river crossings.
The Romano British army was led by Bartholomeus Sinister Grassus himself with Flavius the army standard bearer. The rest of the army consisted of:
* A unit of 15 commanipulares (BSG's personal warrior retinue) led by Cassius, a tribune
* The Invicti Iuniores Brittaniciani, a unit of 18 milites (professional soldiers, in my case with a decidedly Late Roman look)
* Three units of 24 Pedyt, citizens with sticks (low quality warriors)
* Two units of 8 cavalry, classed as mounted milites
* A unit of 10 bow armed skirmishers
* A unit of 10 javelin armed skirmishers (of decidedly Celtic complexion)
Alan's Saxons were essentially the Ecgfrith list from the Age of Arthur book, but with the horsemen replaced by foot sloggers and some other minor modifications to fit Alan's figure mix. They had a general and ASB, and
* A unit of 12 Gedriht (hearth guard) -- the tough professional warriors
* A unit of 12 armoured Duguth -- good veteran warriors
* Two units of 24 unarmoured Duguth
* A unit of 28 Ceorls -- farmers with sticks, as the Pedyt
* A unit of 8 javelin armed skirmishers
* A unit of 8 bow armed skirmishers
Both armies weighed in at around 1500 points.
Alan, being the invader and living up to the Saxon reputation, advanced aggressively across the line, with his hearth guard jogging up to the bridge at a healthy clip (triple move in a three model wide column) and the rest of his army advancing towards the river. Koen advanced the Romano British more cautiously, except for one of the cavalry units that went of on a large outflanking movement.
After the Saxon Gedriht had occupied the bridge and taken up position on it, the action started heating up -- there was only some skirmisher fire left and right during the earlier turns -- in the center around turn 3, when a Saxon Duguth unit set foot in the ford. The duguth were charged by two Romano British units, and the result of this charge would more or less determine the game. After (barely) losing the second turn of melee, the Duguth broke in panic and fled to the rear -- a result that greatly relieved Koen, who was rather glum about his changes in this melee before. This unit fleeing in turn led to the famous WAB morale cascade: at the start of the next turn, every Saxon within a certain distance of their fleeing friends had to check for morale. And, lo and behold, everyone but the Gedriht on the bridge and the lowly Ceorls failed their test and ran off!
Although the next turn did see a slight resurgence in Saxon hopes and fortunres, there never was a full Saxon recovery from this disaster. The slight resurgence was due to a British unit, itself fleeing from a charge in the flank while it was busy to its front, taking a number of its friends with it. All was well again the next turn however, and with the last Saxon unit in the ford area dispatched by the British commanipulares a bit later, the only obstacle was the formidable Gedriht still holding strong on the bridge.
A well placed charge by British pedyt took care of the Gedriht however, who having stayed on the bridge could not deploy any wider than 3 models, reducing their efficiency in the combat.
When the dust had settled, a massive victory was declared for the Romano British. The Saxon invasion had been driven off with massive losses, while the British themselves only lost 22 models (vs the entire army of the Saxons).
We were all very happy with the game and the result, and great fun was had by all. To be continued, definitely.
Sunday, 4 March 2007
The painting queue
This entry is as much for me as a reminder as it is for the edification of the great masses that read this blog (ahem), but here's what I'm planning to paint next, in order.
1. 6 Romano British pedites. These are the last to complete [this lot](http://www.flickr.com/photos/robartes/404715193/).
2. A figure of Winston Churchill in 1920's gangster mode (bowler hat, smoking cigar, clutching Thompson SMG). I got this as a freebie with an order some time ago -- I have no idea anymore from whom, but I'm not sure. This figure will be painted up for a pulp game Phil is putting on next (though he might not be used in the game, that's up to Phil).
3. 8 Renegade Celtic archers. To replace the generic types currently serving as the missile arm of my [Celts](http://www.nirya.be/snv/ttm/archives/000197.html).
4. 8 Pictish slingers from [Black Tree Design](http://www.black-tree-design.com). I got these at the last Red Barons convention from the store in Mons that was selling of stock at 50% off. These will serve in the Romano British army as extra skirmishers.
5. No idea yet. Further directions might be building an Arthurian age Pictish army, starting the Carolingians, or something else entirely.
That's it -- plenty of painting to do.
Tuesday, 27 February 2007
Romano British pedites
Since I've decided to [paint a bit faster](http://www.nirya.be/snv/ttm/archives/000248.html) I also decided to group miniatures to have their photos taken. As that leads to a lower frequency of pictures being posted, I've decided to put them up as real posts, under the new [Wet Paint category](http://www.nirya.be/snv/ttm/archives/cat_wet_paint.html), in addition to posting them on Flickr.
The entries in question, like this one will be mostly pictures only, with the occasional comment. To wit:

The impossibly big banner is made out of cloth (cutoffs of an Ikea curtain, if you must know).
Comments are open.
The entries in question, like this one will be mostly pictures only, with the occasional comment. To wit:
The impossibly big banner is made out of cloth (cutoffs of an Ikea curtain, if you must know).
Comments are open.
Thursday, 22 February 2007
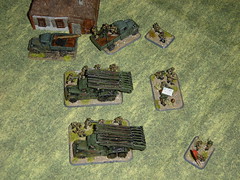
Flames of War - my Soviet army
Bart asked me to write up a piece on the army that I have built up for Flames of War. So, here we are, and first, a few words on the game system. Flames of War is basically a company level game, with a design a little reminiscent of WHAB - simple basic mechanisms but lots of chrome and special rules to reflect specifics of individual armies. It works very well. The games are short, violent and often funny.
The rule-set is brilliantly supported by Battlefront, the publisher. It produces the figures (very nice quality 15mm) and armour (the models are made from a mix of resin and metal), packaged in platoon or company packs, with the bases you need and painting guides. The website gives a lot more background, including profiles of different units, guides to putting together the models, lots of photos of painted miniatures, etc. - all extremely useful. They have also worked with Vallejo to provide sets of suitable paints, which again is pretty helpful.
Some might complain that this approach makes it too easy, or takes the fun out of building the army. In a way, this is true, but you have to acknowledge that it is a winning method and will certainly be instrumental in attracting people to historical wargames. You can now buy, effectively, a box with rules, army organisation and lists, paints and a painting guide.
In the same way as WHAB uses 2000 points armies, DBM uses 400 points armies etc., FOW has a system of army lists (those who are allergic to lists can simply use them as a helpful guide to putting scenarios together) that provide for 1500 point armies that slug it out over a 6x4 foot (2x1.2 m) table. The game system currently supports three theatres of war:
- Russian front 1942-3
- North Africa
- 1944 Western Front.
For each theatre, there are a series of gamebooks listing the available armies. Each army has its own characteristics and special rules. I have always wanted a Soviet army, having a slight soft spot I suppose for the command economy and dialectical materialism, so the choice was easy.
Having selected the country, what sort of army? The army list books define different types of company - an infantry company, an armoured company or a reconnaissance company for example. I personally think that if you're playing WW2, you better have tanks, so I decided to build a soviet armoured unit.
The soviets in FOW are characterised, not unreasonably, as 'conscript (ie cheap, difficult to control, very vulnerable) but fearless (easy to rally even when taking casualties). This means you get vast numbers of them - where for a German army you have a company, for a soviet army you have nearly a battalion, but they are pretty unmanoeuverable and are very inflexible. For instance, a German panzer can dance rings around them, can move, shoot and then, potentially move again. A soviet tank can barely move and fire in the same turn, which is very limiting.
The heart of the army is two tank companies and of course, the T34 provides the backbone. I have one company of 7 T34s plus a company of 6 T70 light tanks. These latter are quite pretty and fast, but very vulnerable to enemy fire, having little armour to speak of.
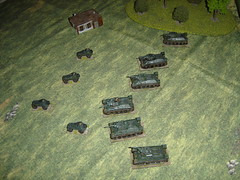
T34s
Originally uploaded by ahuyton.
To back these up, are tank riding infantry with supporting machine guns plus a medium mortar company (these are cheap and very effective in the rules). Additional options that I have available, are heavy KV1 tanks (brutal things), Katyushas (fun but vulnerable - enemy artillery can automatically home in on them if the Katyushas fire), BA64 armoured cars, anti tank rifles and heavy mortars.
Katyushas
Originally uploaded by ahuyton.
Overall, I think, my favourite selection is:
* A Cin C with supporting AA machine guns
* A company of T34s, to provide a fast and reasonably hard hitting shock weapon
* A company of T70s, cheaply bought and handy backup to the other tanks
* A company of 3 KV1e, which even German tanks find difficult to shoot up.
* One platoon of infantry + mg to seize woods, buildings etc
* A medium mortar platoon plus spotter to try to pin enemy infantry or guns
* A reconnaissance unit of light armoured cars, which I think serves little purpose, but I think they're quite fun little models.
I have played three games with them, and lost each one, they are really quite difficult to control. At least that's my excuse.
I can unreservedly recommend the system and everything that goes with it, it has all the elements of a good,well thought out system that works and is properly supported. For the Belgian readers, L'Antre Jeux in Brussels sells all the stuff, including all the paints.
I now have 3000 points worth of Soviets, enough to start varied scenario games as well as giving me different options in the tournaments style games (yes there is a FOW tournament scene). Next, I want to paint up an opponent for them, and have decided, perhaps perversely, to go for a Finnish army - a very different affair. Elite troops, so few in number and with little armour to speak of. I hope it will make for an interesting match up.
_Update_ (robartes): added some formatting, removed big white space after first photo
The rule-set is brilliantly supported by Battlefront, the publisher. It produces the figures (very nice quality 15mm) and armour (the models are made from a mix of resin and metal), packaged in platoon or company packs, with the bases you need and painting guides. The website gives a lot more background, including profiles of different units, guides to putting together the models, lots of photos of painted miniatures, etc. - all extremely useful. They have also worked with Vallejo to provide sets of suitable paints, which again is pretty helpful.
Some might complain that this approach makes it too easy, or takes the fun out of building the army. In a way, this is true, but you have to acknowledge that it is a winning method and will certainly be instrumental in attracting people to historical wargames. You can now buy, effectively, a box with rules, army organisation and lists, paints and a painting guide.
In the same way as WHAB uses 2000 points armies, DBM uses 400 points armies etc., FOW has a system of army lists (those who are allergic to lists can simply use them as a helpful guide to putting scenarios together) that provide for 1500 point armies that slug it out over a 6x4 foot (2x1.2 m) table. The game system currently supports three theatres of war:
- Russian front 1942-3
- North Africa
- 1944 Western Front.
For each theatre, there are a series of gamebooks listing the available armies. Each army has its own characteristics and special rules. I have always wanted a Soviet army, having a slight soft spot I suppose for the command economy and dialectical materialism, so the choice was easy.
Having selected the country, what sort of army? The army list books define different types of company - an infantry company, an armoured company or a reconnaissance company for example. I personally think that if you're playing WW2, you better have tanks, so I decided to build a soviet armoured unit.
The soviets in FOW are characterised, not unreasonably, as 'conscript (ie cheap, difficult to control, very vulnerable) but fearless (easy to rally even when taking casualties). This means you get vast numbers of them - where for a German army you have a company, for a soviet army you have nearly a battalion, but they are pretty unmanoeuverable and are very inflexible. For instance, a German panzer can dance rings around them, can move, shoot and then, potentially move again. A soviet tank can barely move and fire in the same turn, which is very limiting.
The heart of the army is two tank companies and of course, the T34 provides the backbone. I have one company of 7 T34s plus a company of 6 T70 light tanks. These latter are quite pretty and fast, but very vulnerable to enemy fire, having little armour to speak of.
T34s
Originally uploaded by ahuyton.
To back these up, are tank riding infantry with supporting machine guns plus a medium mortar company (these are cheap and very effective in the rules). Additional options that I have available, are heavy KV1 tanks (brutal things), Katyushas (fun but vulnerable - enemy artillery can automatically home in on them if the Katyushas fire), BA64 armoured cars, anti tank rifles and heavy mortars.
Katyushas
Originally uploaded by ahuyton.
Overall, I think, my favourite selection is:
* A Cin C with supporting AA machine guns
* A company of T34s, to provide a fast and reasonably hard hitting shock weapon
* A company of T70s, cheaply bought and handy backup to the other tanks
* A company of 3 KV1e, which even German tanks find difficult to shoot up.
* One platoon of infantry + mg to seize woods, buildings etc
* A medium mortar platoon plus spotter to try to pin enemy infantry or guns
* A reconnaissance unit of light armoured cars, which I think serves little purpose, but I think they're quite fun little models.
I have played three games with them, and lost each one, they are really quite difficult to control. At least that's my excuse.
I can unreservedly recommend the system and everything that goes with it, it has all the elements of a good,well thought out system that works and is properly supported. For the Belgian readers, L'Antre Jeux in Brussels sells all the stuff, including all the paints.
I now have 3000 points worth of Soviets, enough to start varied scenario games as well as giving me different options in the tournaments style games (yes there is a FOW tournament scene). Next, I want to paint up an opponent for them, and have decided, perhaps perversely, to go for a Finnish army - a very different affair. Elite troops, so few in number and with little armour to speak of. I hope it will make for an interesting match up.
_Update_ (robartes): added some formatting, removed big white space after first photo
Wednesday, 21 February 2007
Currently painting
It's time for another 'what I'm painting' entry. Currently on my painting table are two groups of figures:
* The 'one offs'. These are a mix of stuff, which I started painting mostly because I ran out of other prepared figures to paint and had to root around in my boxes for things that had been prepped already. Currently in this set are a fantasy figure, a pack donkey, a Foundry Plains Indian and two Darkest Africa figs, one bearer and one askari. All of these are in various stages of (un)completion. Most of the work is however going to:
* Gripping Beast Arthurian figures. This has a lot to do with the new [Age of Arthur](http://www.warhammer-historical.com/arthur/arthur.asp) book, of course. Basically, I scrounged up my last stash of unpainted GB Arthurian infantry -- just enough to make up, together with some rebasing of figures painted earlier, another 24 man Pedyt unit. Currently, 14 figures have been painted (although I cheated on 6 of them, as they had been painted almost 10 years ago), 3 of which have been seen in [photographs](http://www.flickr.com/photos/robartes/sets/72157594504636640/) already. The next batch will be photographed once their leader, who's currently on the painting desk and about halfway done, has been painted. I'm basing twelve of the unit's figures 6 each on a 6x4cm base, so I'm photographing them when these two bases are done. After that, it's another 9 singly based figures (three of which are half completed) to complete the unit.
After the GB Arthurians are done, I'll switch to another unit (I'm beginning to like unit painting [lately](http://www.nirya.be/snv/ttm/archives/000248.html) ) -- probably either Carolingians or Napoleonic Chasseurs à Cheval. As to that last: I made the mistake of reading [Baron de Marbot's memoirs](http://www.gutenberg.org/etext/2401) and now find myself curiously urged to paint the 23rd Chasseurs and per extension the whole of II Corps in 1812. Oh my.
Thursday, 15 February 2007
Saturday, 10 February 2007
"Oil Wiping" horses using acrylics
One technique to paint horses, described among others in Kevin Dallimore's [Foundry book](http://www.wargamesfoundry.com/books/kevsbook/index.asp), is the 'oil wiping' technique. It involves using dark oil paint (hence the _oil_ part) that is painted all over the horse and then wiped off (and there's the _wipe_ part) of most of the horse again, leaving the oil paint only in the recesses of the model. This creates an instant realistic shading which is hard to reproduce with more standard techniques.
The two properties of oil paint that are exploited by this technique are its long drying time (if you tried this with acrylics, they probably will have dried on the model before you wiped them off) and the fact that in thin enough layers it is translucent, so you get a sort of blended effect.
The disadvantages of the technique are those of oil paint: messier to clean up (and you shouldn't really chuck turps or white spirit down the drain, so there's that problem as well) and it takes a long time to dry. And not everyone has a ready stash of oil paints lying around (they tend to be expensive, too).
So, thought I, [Vallejo](http://www.acrylicosvallejo.com) to the rescue! In addition to the colors themselves, the Model Colour series also includes a few other items, two of which I've used to recreate the oil wipe technique using acrylics. The products I've used for this are matt medium (540) and drying retarder (597). The matt medium is basically the liquid that carries the pigment in the paints themselves (the paints are, reduced to their essence, a mixture of medium, binder and pigment), and the retarder is a chemical (some glycerine derivative, but I could be wrong there) that extends the drying time of the paint.
These two agents combined and added to normal paint result in the same properties as the oil paint (more or less): longer drying time (the retarder) and slight translucency (more like less covering power really, the medium). As we say in Dutch, tadaa!
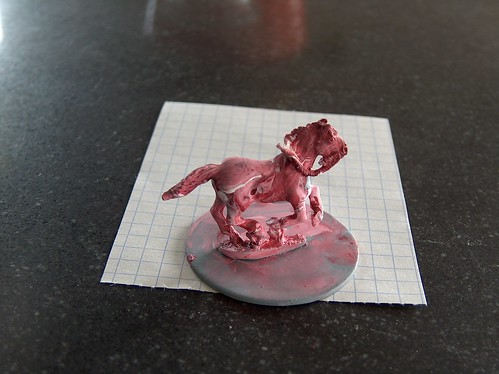
To put my pixels where my mouth is, here's a picture of a horse shaded using this technique. The horse base colour is Flat Brown (984), which was shaded with a 1:1:1 mixture of Dark Brown (822) : retarder : medium. The shade coat was painted all over the horse (literally) and then wiped of with apeacepiece of tissue. This is the result:
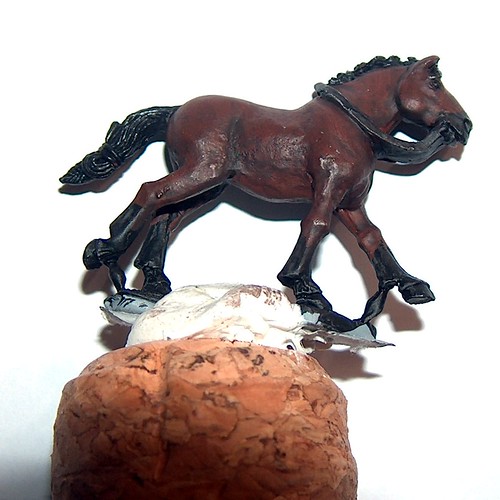
Some of the basecoat has been wiped off where bits of metal protrude from the model (bad cleaning of the model), so I'll give this a quick drybrush with Flat Brown again to touch up. Otherwise, not a bad result, I'd say.
The two properties of oil paint that are exploited by this technique are its long drying time (if you tried this with acrylics, they probably will have dried on the model before you wiped them off) and the fact that in thin enough layers it is translucent, so you get a sort of blended effect.
The disadvantages of the technique are those of oil paint: messier to clean up (and you shouldn't really chuck turps or white spirit down the drain, so there's that problem as well) and it takes a long time to dry. And not everyone has a ready stash of oil paints lying around (they tend to be expensive, too).
So, thought I, [Vallejo](http://www.acrylicosvallejo.com) to the rescue! In addition to the colors themselves, the Model Colour series also includes a few other items, two of which I've used to recreate the oil wipe technique using acrylics. The products I've used for this are matt medium (540) and drying retarder (597). The matt medium is basically the liquid that carries the pigment in the paints themselves (the paints are, reduced to their essence, a mixture of medium, binder and pigment), and the retarder is a chemical (some glycerine derivative, but I could be wrong there) that extends the drying time of the paint.
These two agents combined and added to normal paint result in the same properties as the oil paint (more or less): longer drying time (the retarder) and slight translucency (more like less covering power really, the medium). As we say in Dutch, tadaa!
To put my pixels where my mouth is, here's a picture of a horse shaded using this technique. The horse base colour is Flat Brown (984), which was shaded with a 1:1:1 mixture of Dark Brown (822) : retarder : medium. The shade coat was painted all over the horse (literally) and then wiped of with a
Some of the basecoat has been wiped off where bits of metal protrude from the model (bad cleaning of the model), so I'll give this a quick drybrush with Flat Brown again to touch up. Otherwise, not a bad result, I'd say.
Thursday, 8 February 2007
Memorable gaming moments
When we think of past games some of them just tend to stick out, while others are simply forgotten. These games, which make it onto your memory hard drive, are sometimes the results of good planning and a clever scenario twist by the gamemaster but sometimes they are simply the result of dismal bad or freaky good luck. Here are some of my favourite moments:
BartV had planned a WWII desert game in which two players would look over the table, spot the enemy and do the minor manoeuvring while two other players acted as supreme commanders, sitting in an adjacent room who planned general manoeuvring, off board artillery fire etc. Before the game each team had bitter little time to draft a crude map of the terrain board on which the commander could direct his moves. I acted as commander in the field and together with my general we decided at the last instant to ad markers at key points on the map so we could easily assign artillery fire. Communication between office and field went by brief notes which passed through the game master (who rolled and checked if the message arrived in time, got delayed or got lost)
Anyway, at some point during the game my opponent positioned his troops on one of our preassigned artillery spots (point alpha) so I sent in a request for artillery fire. The next turn nothing happened so, presuming the order got lost or delayed, I repeated my request. In the mean time my own troops were coming under heavy artillery fire so I was getting desperate! My opponent was still firmly lodged on point alpha though so yet again I called in artillery hoping that this time the order would pass after already 2 failed attempts! But yet again, no artillery shells were hitting my opponent while my troops took some more enemy fire... this was when I realised that I was positioned on our preassigned point x (yes we named them x,y,z and alpha, beta, gamma, we were in a hurry remember) and my general had mistaken my hastily scribbled alpha for an x ! Never again was the fog of war this well captured :-)
Again during a WWII game I was playing the German commander. I was a happy German commander as among my troops was the dreaded annihilator of tin cans, the infamous flak88 gun. When this beauty entered the field (on my left side of the table) right on the spot where my opponent was planning his major tank putsch I could see the colour strip from his face. He immediately started to do some frantic major redeploying while I did some major gloating. The gloating lasted till turn two when the umpire (BartV you bastard ;-)) passed me an order from my NPC supreme commander stating that the flak88 should strengthen the (off-board) eastern front immediately!. The entire game the flak88 was seen making its way to the right side of the board. Causing serious bewilderment to my opponent who was franticly trying to make out what the hell I was planning, all the time adapting his plans to the ever changing flak88’s position... until it disappeared off board that is. The look on his face was priceless :-)
So what are your memorable moments?
Oops
It seems that in a flurry of spam fighting, I accidentally deleted the last 10 real comments to this blog. No sinister doings going on, nor is censorship being applied. Just me pushing buttons before a decent dose of caffeine has entered my bloodstream. Sorry about that.
Wednesday, 7 February 2007
Why I like Warhammer Ancient Battles
I can't hide it anymore - I like [Warhammer Ancient Battles](http://www.warhammer-historical.com). Yes, its name starts with Warhammer, and yes, it comes from what many think of as the Evil Empire (capitalisation intentional) of miniature wargaming, but I think it's exactly the right ruleset to play ancients with for me. Let me explain why.
Way back when, I used to play DBM. Even though I became moderately good at it, and still have a large amount of 15mm Ancients figures collected with DBM in mind, I could never escape a certain feeling of unease at it (read more [here](/snv/ttm/archives/000023.html)). Was it the 'equal points and line up' attitude, the fact that armies from a time span of well over twenty centuries were supposed to fight each other (although that's a general ancients period thing, not strictly DBM), the competitive streak DBM seems to bring out in a certain type of gamer (yes, I have participated in competitions too), I do not know. Whatever it was, I think it is telling that the period I was heavily involved in DBM was that in which the Schild en Vriend crowd was in hibernation in various parts of the world - I just haven't figured out quite what it is telling me though :)
All that changed with the arrival of WAB. It took me a while to play it, for various reasons, but I liked what I saw when I did. For the rest of this entry, I'll list some of the reasons why I like the ruleset.
### Figure scale
Of course, as with any ruleset including DBM, WAB can be played with any scale of figures you want, but the prevailing culture in WAB land is to play with 28mm figures, the One True Scale. While other scales can provide a more realistic look of massed armies (6mm comes to mind, with its collection of [evangelists](http://www.baccus6mm.com)) or better tradeoff between cost and visual appeal (15mm), the King of scales for me remains 28mm. There's a particular appeal to having a bunch of 28mils on the table that I find particularly attractive. 15mm and lower does not do the same for me. And if you like the painting side of the hobby, 28mils are more satisfying as well.
### Supplements
Ah, supplements - a touchy subject. One of the reasons GW is maligned in certain corners is its rampant 'supplementitis'. There's a supplement for every army, and they're usually updated every few years, locking you into a buy-buy-buy circle just to stay up to date. WAB also has supplements for various periods. The basic rulebook gives you just some stats for Romans and 'Barbarians' (Celts for the rest of us), plus a few armies that used to be in Armies of Antiquity but are not (yet) covered by their own supplement. Other than that, there's the supplements.
WAB supplements tend to be organised along periods: there's a supplement for chariot age (middle eastern bronze age) warfare, one on the Byzantine period, one on the Late Roman period, etc. Each supplement, though later more than earlier, has lots of interesting information in addition to the army lists for the various armies represented: bits on the history of the period (albeit in severely potted form), collecting and painting appropriate figures, wargaming tactics and usually some scenarios and other things. The latest supplement, Age of Arthur, is particularly good in this regard (though that's for another post).
Nothing new so far, but the real refreshing thing with these supplements is the fact that the armies in them are intended to be balanced *only against each other*. Disadvantages of points systems aside (yet another post, there), you can expect an X point army from supplement A to be more or less evenly matched against another X point army from supplement A but not against an X point army from supplement B. This, combined with the period focus of the supplements results in a wargame culture where, instead of Bronze Age Egyptians taking the field against Later Burgundian Ordonnance lobsters, focus is on in period gaming, something that can only be applauded IMO.
### Production
As compared to the majority of rules publications on 'our side' of the hobby, the production quality of the books is just stunning, with good printing, good layout and stunning photographs (wargamer's porn) abound. Granted, not everyone has the same amount of financial oomph as GW, but when even a single person such as Pete Jones can produce good quality rulebooks ([Blitzkrieg and Cold War Commander](http://www.blitzkrieg-commander.com)), the monochrome, dense type, not an illustration in sight type of publication is a real let down for a bunch of wargamers for whom 'Visual Appeal is Everything'.
### It's oodles of fun
The main reason I like WAB however, is that it's quite simply a good game of toy soldiers. Face it, we're only pretending to recreate history through simulated engagements on the table top or studying models of nation state interactions in times of crisis. In reality, we're all just boys (and girls) playing with our toy soldiers again. And that's just what WAB provides: a game of toy soldiers with an historical flavour.
Right, that's it - comments are open (although the commenter going by the nom de plume of _wet thong_ is asked to kindly refrain from commenting)!
Tuesday, 30 January 2007
Surely the sky must be falling down...
... when I've stopped painting eyes on my miniatures.
Case in point is this miniature, and the ones before it in my [Flickr photostream](http://www.flickr.com/photos/robartes):
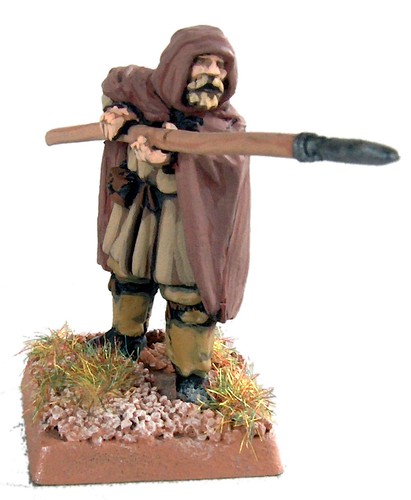
As noted in the comments on one of my earlier pictures, I've finally crossed a final frontier in painting. Over the years, I've always tried to paint each and every miniature as if it was going to end up in a painting competition (and most of them eventually did), but as many a wargamer knows, if you want to actually play with your painted toy soldiers, that standard of painting is not compatible with getting lots of figures on the tabletop.
So, in order to change this, I have gradually lowered the standard of painting for my figures, starting with 15 mils, then 20 mm figures and now, finally, I have crossed the final frontier and started painting the big boys to a tabletop standard as opposed to a competition standard. This evolution is inevitable if you want to actually play with your toy soldiers, and I still think of myself more as a wargamer than as a figure painter.
First indication of this was when I, after ten years, did not enter a figure in the Crisis painting competition -- a trend that seems to be general as the organisers complained about a lack of historical subjects in the competition. This is normal, as the competition [has moved](http://www.nirya.be/snv/ttm/archives/000134.html) towards a competition for painters, no longer for wargamers.
Now what is different about the 'tabletop' painting standard? For one, I don't paint eyes anymore. It's only a few minutes gained, but every minute counts. I also lower the number of layers to the minimum I can get a way with. On large areas, such as the above figure's cloak, I still do three layers, but the vast majority of areas get only two (e.g. the skin and trousers of the figure). Detail stuff, such as the belt get only a single layer, and I often don't even bother painting the shoes (they just get a drybrush of the color of the base over the undercoat).
Another 'trick' I use, which is nothing new of course, is to have number of figures on the go. That way, whenever I take a color, I apply it to various figures, e.g. this figure's cloak is blue, that one's trouses will be blue, and that one's tunic. This way, you get some of the benefit from an assembly line painting system without some of the disadvantages.
And does it work? Well, over the last three weeks or so, I painted over 10 figures, which is not much by some standards, but is significantly more than my previous output.
Case in point is this miniature, and the ones before it in my [Flickr photostream](http://www.flickr.com/photos/robartes):
As noted in the comments on one of my earlier pictures, I've finally crossed a final frontier in painting. Over the years, I've always tried to paint each and every miniature as if it was going to end up in a painting competition (and most of them eventually did), but as many a wargamer knows, if you want to actually play with your painted toy soldiers, that standard of painting is not compatible with getting lots of figures on the tabletop.
So, in order to change this, I have gradually lowered the standard of painting for my figures, starting with 15 mils, then 20 mm figures and now, finally, I have crossed the final frontier and started painting the big boys to a tabletop standard as opposed to a competition standard. This evolution is inevitable if you want to actually play with your toy soldiers, and I still think of myself more as a wargamer than as a figure painter.
First indication of this was when I, after ten years, did not enter a figure in the Crisis painting competition -- a trend that seems to be general as the organisers complained about a lack of historical subjects in the competition. This is normal, as the competition [has moved](http://www.nirya.be/snv/ttm/archives/000134.html) towards a competition for painters, no longer for wargamers.
Now what is different about the 'tabletop' painting standard? For one, I don't paint eyes anymore. It's only a few minutes gained, but every minute counts. I also lower the number of layers to the minimum I can get a way with. On large areas, such as the above figure's cloak, I still do three layers, but the vast majority of areas get only two (e.g. the skin and trousers of the figure). Detail stuff, such as the belt get only a single layer, and I often don't even bother painting the shoes (they just get a drybrush of the color of the base over the undercoat).
Another 'trick' I use, which is nothing new of course, is to have number of figures on the go. That way, whenever I take a color, I apply it to various figures, e.g. this figure's cloak is blue, that one's trouses will be blue, and that one's tunic. This way, you get some of the benefit from an assembly line painting system without some of the disadvantages.
And does it work? Well, over the last three weeks or so, I painted over 10 figures, which is not much by some standards, but is significantly more than my previous output.
Wednesday, 10 January 2007
Battle of The Angle (ACW)
Yesterday we played another 'back to basics' ACW game, using floppy plastic figures and hexified Brother against Brother. The game was based on scenario n° 2 _Threat to the Flank_ from _Scenarios for all ages_ (Grant & Asquith), with the Union troops being the attacking troops in the face of Confederate resistance.
The Union troops needed to throw the Confederate forces off a hill on the way south 'before nightfall'. Said hill lay behind a river, the part of which immediately in front of the hill was fordable, while the rest was uncrossable, except by a bridge off towards the edge of the table. To accomplish their goal, the Union had sent a sizable force (2 infantry units, two cavalry squadrons and a gun battery) on a flanking march towards the bridge with the intent of outflanking the main Confederate position. Unlucky for them, a Confederate scout had detected the flanking movement and the Confederate commander had responded by sending his own detachment of 1 infantry unit, 2 cavalry squadrons and a gun battery towards the same bridge. That was the starting point of the scenario.
In our game, the Union side was played by Eddy and Phil, while Koen and Bart played the Confederates. As one of the Confederate players, I'll describe the battle from that viewpoint.
The Union advanced fairly cautiously, making good use of intervening hedges for cover on the way to the central hill. On the flank, two Union cavalry squadrons rushed over the bridge, while their infantry attempted to infiltrate in the woods across the river from our artillery battery.
The Union artillery deserves special mention in this phase. Both batteries were virtually wiped out without firing a shot by turn 3. The battery on the Union left side (opposite the main hill and The Angle) was devestated by Confederate musketry causing 80% casualties with one volley of one infantry unit (go 1st Maryland!), while the flanking artillery attempted to set up on a hill opposite the Confederate 7th Georgia, which wiped it out of existence with two volleys. Some of the loudest cheers in the game thereafter were heard when the two remaining gunners of the hill battery managed to load their gun and let of a shot :).
Also deserving special mention was the 2nd New Jersey Infantry which, in a mad display of inspiredness, charged out of cover, across the river and up to the hedge at The Angle while the rest of the Union troops were still moves away. Amazingly, the 2nd New Jersey would survive till just before the end of the game, always being the furthest advanced northern unit in the game.
In the center, The Angle became the Bloody Angle. Union infantry moved up close and started reducing the Confederate infantry behind the hedge by fire (although they also took casualties proportionally from the return fire). When the line was weakened enough, a Union cavalry squadron charged in to break the line. It succeeded, destroying the last remaining Confederate infantry, but was itself promptly counter charged by the Confederate cavalry squadron that had been deployed behind the infantry line all game patiently waiting for this opportunity to counterattack. Add in another Union cavalry squadron and after a few turns the space behind the hedges resembles nothing less than an abattoir. Bloody Angle indeed.
Unlucky for the Union troops however, the various cavalry charges and musketry exchanges going on had knocked out all three of their officers, leading to the entire army being out of command and having to take a forced pause.
At this point, it was near midnight real time, so we decided to call it a day.
It was a very enjoyable game, with particularly the swirling cavalry melee on the flank and the bloody fighting around the Angle 'feeling right'. I think everyone had great fun (of course, Phil's bottle of champagne before the game might have helped there). The BaB rules have proven their worth again, and with a small bit of tweaking in the cavalry hex conversion rules and a rather larger bit of tweaking in the melee rules (which can be cumbersome), they'll serve us well for many games to come.
The Union troops needed to throw the Confederate forces off a hill on the way south 'before nightfall'. Said hill lay behind a river, the part of which immediately in front of the hill was fordable, while the rest was uncrossable, except by a bridge off towards the edge of the table. To accomplish their goal, the Union had sent a sizable force (2 infantry units, two cavalry squadrons and a gun battery) on a flanking march towards the bridge with the intent of outflanking the main Confederate position. Unlucky for them, a Confederate scout had detected the flanking movement and the Confederate commander had responded by sending his own detachment of 1 infantry unit, 2 cavalry squadrons and a gun battery towards the same bridge. That was the starting point of the scenario.
In our game, the Union side was played by Eddy and Phil, while Koen and Bart played the Confederates. As one of the Confederate players, I'll describe the battle from that viewpoint.
The plan
Our plan was fairly straight forward. We wanted to defend the hill slightly forward of it, behind an angled row of hedges (soon to become a Bloody Angle of our own) with an artillery battery on the hill behind it. The flanking force was to deploy its battery well forward to a spot where it was covered by woods on the flank and with a clear field of fire to the bridge. The infantry unit (the 7th Georgia) was to provide fire support on the flank of the battery, while the cavalry squadrons would charge anything crossing the bridge.Phase 1: Union approach
The initial turns of the game saw our planned deployments developing satisfactorily: the infantry units moving up to the hedge at 'The Angle' received some long range musketry but reached the hedge more or less intact while the artillery battery on the hill inflicted some casualties on the opposing Union troops. On the flank, the artillery and infantry quickly reached their appointed positions, while the cavalry cautiously moved up to a stream on the way to the bridge.The Union advanced fairly cautiously, making good use of intervening hedges for cover on the way to the central hill. On the flank, two Union cavalry squadrons rushed over the bridge, while their infantry attempted to infiltrate in the woods across the river from our artillery battery.
The Union artillery deserves special mention in this phase. Both batteries were virtually wiped out without firing a shot by turn 3. The battery on the Union left side (opposite the main hill and The Angle) was devestated by Confederate musketry causing 80% casualties with one volley of one infantry unit (go 1st Maryland!), while the flanking artillery attempted to set up on a hill opposite the Confederate 7th Georgia, which wiped it out of existence with two volleys. Some of the loudest cheers in the game thereafter were heard when the two remaining gunners of the hill battery managed to load their gun and let of a shot :).
Also deserving special mention was the 2nd New Jersey Infantry which, in a mad display of inspiredness, charged out of cover, across the river and up to the hedge at The Angle while the rest of the Union troops were still moves away. Amazingly, the 2nd New Jersey would survive till just before the end of the game, always being the furthest advanced northern unit in the game.
Phase 2: The crunch
All of this preparatory maneuvring led up to the crunch a few turns later. On the flank the Confederate artillery and infantry eventually redeployed to help their beleaguered colleagues near The Angle, but the real fight there was between gentlemen: the four cavalry squadrons (two on each side) got into a big swirling cavalry melee lasting a few turns. When the dust had settled, only two horsemen on each side were left standing, being out of command or retreating.In the center, The Angle became the Bloody Angle. Union infantry moved up close and started reducing the Confederate infantry behind the hedge by fire (although they also took casualties proportionally from the return fire). When the line was weakened enough, a Union cavalry squadron charged in to break the line. It succeeded, destroying the last remaining Confederate infantry, but was itself promptly counter charged by the Confederate cavalry squadron that had been deployed behind the infantry line all game patiently waiting for this opportunity to counterattack. Add in another Union cavalry squadron and after a few turns the space behind the hedges resembles nothing less than an abattoir. Bloody Angle indeed.
Unlucky for the Union troops however, the various cavalry charges and musketry exchanges going on had knocked out all three of their officers, leading to the entire army being out of command and having to take a forced pause.
At this point, it was near midnight real time, so we decided to call it a day.
Analysis
As to the result of the game, the consensus was that the Union would probably have succeeded in getting over the hill (there was by then only one full Confederate infantry unit left on the hill -- the redoubtable 1st Maryland), although given the fact that they had some reorganising to do and they were currently leaderless, they would not have succeeded 'before nightfall'. The exact definition of 'before nightfall' is not mentioned in the scenario, however, so there is some room for discussion there :)It was a very enjoyable game, with particularly the swirling cavalry melee on the flank and the bloody fighting around the Angle 'feeling right'. I think everyone had great fun (of course, Phil's bottle of champagne before the game might have helped there). The BaB rules have proven their worth again, and with a small bit of tweaking in the cavalry hex conversion rules and a rather larger bit of tweaking in the melee rules (which can be cumbersome), they'll serve us well for many games to come.
Monday, 8 January 2007
Dude, where's my sand?
Whilst idly browsing [Ebay](http://www.ebay.co.uk) (as one does), I came across this auction:

That's right: you can buy a handful of sand. The same stuff that's outside everyone's door, in every backyard and every gutter, or that -- if you live in Alaska and it's minus seventy or so -- you can buy from your local DIY store by the 50kg bag for the same price as this auction's meagre 100 grams.
Anyway, if you're looking for sand, [look no further](http://cgi.ebay.co.uk/SALE-BASING-SAND-Wargames-Figures-Scenery-15mm-28mm-DBA_W0QQitemZ180068966955QQihZ008QQcategoryZ123863QQrdZ1QQcmdZViewItem). I really don't know where to start here. There is the use of a number of totally irrelevant (28mm sand, anyone?) but high scoring keywords in the auction title -- certain to be appreciated by the discerning bidder. Or the fact that one of the first lines in the description mentions 'over inflated prices' at hobby stores -- probably as opposed to merely inflated on this offer. Or the implication that just by buying this sand (not any other, mind you) will lead you to the ultimate in figure basing.
Ah, Ebay :)
Wednesday, 3 January 2007
A new 'painting tray'
Those of you who follow me less than regular [workbench photos](http://www.flickr.com/photos/robartes/sets/72057594098116252/), have seen that I put figures on champagne type corks (lots of those around these days), using a bit of blue tack (which is white in Belgium) while painting them. The corks are hefty enough to handle comfortably and keep me from handling the possibly freshly painted figures.
On the [painting station](http://www.nirya.be/snv/ttm/archives/000006.html), the corks are held down using blue tack again. This is a workable system, except that during painting sessions, I set the corks on the table next to the painting station. As that very same table is used by my wife when she is working on her laptop or correcting papers and exams (she teaches chemistry), it tends to wobble unpredictably on occasion. This has predictably led to several of the figure and cork stacks tumbling down to a messy end on the floor. Not ideal.
The solution is, of course simple:

The box is a simple shoebox (albeit of children's shoes), while the dividers are 5mm balsa wood. I had built this box originally to accomodate a type of 'matrix painting' but it only recently dawned on me (I'm slow sometimes) that it can be used to hold the corks and figures for normal painting sessions too.
So there you have it, a [Hyun](http://www.weetoysoldiers.com) style contraption to ease a wargamer's life :).
Subscribe to:
Posts (Atom)