
To start with, here's a random selection of some photos taken during the game:
The full set is [here](http://www.flickr.com/photos/robartes/sets/385266/). You might want to open these in a new window to follow along with the text.
Having played Armati a few times before, I knew that the key to winning in this game is to get a heavy unit (i.e. heavy infantry or heavy cavalry) into the flank or rear of an opponent's line, preferably when said line is already engaged in a fight to its front. Failing that, getting a light unit into the enemy flank is a second, less effective but still interesting, option. Luckily, the campaign stipulated that I got the drop on the barbarians wrg to deployment, so I could deploy second. Alan deployed his troops with a big block of warbands between two woods, a second block on the left flank, some skirmishers in the woods linking these two blocks and his cavalry out on the extreme flanks.
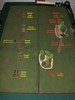
Seeing this deployment, my plan was to engage one of the warband blocks with the Roman legions, while the auxilia would try to flank the warband by moving through the woods bordering their deployment. The heavy cavalry was deployed on the same, right, flank, with the intent to defeat the opposing heavy cavalry and then moving on into the rear of the warband, although I did not have high hopes for this last part of the plan, knowing the limited maneuvrability of heavy troops in Armati (quite historically correct, probably). The Roman left flank was held by skirmishers only, as I had no intent of fighting a decisive engagement there.
I must say that the plan worked perfectly. It was helped immensely by the German heavy cavalry getting scared of the opposing Roman cavalry and attempting to get away from them, only to result in them getting caught in the rear while disordered - not a good thing. By the end of the second turn, the German heavy cavalry was off the field and my cavalry was wheeling past to try and reach the rear of the warband line.
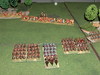
In the center, the legions and auxilia advanced steadily. The legionaries contacted the opposing line of warbands -- which had sensibly come forward with the threat of Roman cavalry to their rear -- in the third turn of the game, while the auxilia entered the woods but were unable to charge the flank of the warband as these had already advanced too far forward. The auxilia would spend the rest of the game sitting in the forest counting squirrels.
On the left, there was some skirmishing fire on the German warbands there, and I made the mistake of coming too close to the German light cavalry (which was not in a controlled division -- Armati speak for it not being able to move voluntarily), drawing it into a melee with my two light cavalry which ended up with me losing a unit of horse archers. Otherwise, not much happened on that flank, except far some pretty impressive yet ultimately futile maneuvring by the German warbands stationed there.
The main action of the battle was the clash between the legions and warband in the center. I knew I had taken a risk charging the warband, as warband have a good chance of seriously damaging the legionaries on the initial round of combat, but I had taken precautions by deploying the legionaries in a deep formation. (In Armati, warband have _impetus_ which means they automatically break opposing enemy units in melee if they win the combat. Certain units, such as Roman cohorts, can counter this by choosing to deploy in a deep formation, meaning a successful warband will "only" cause 3 out of 4 breakpoints instead of breaking the unit outright). This meant that I would probably survive the initial contact round if I was unlucky, and lock the warband into combat until my cavalry would arrive.
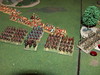
And that is exactly what happened -- three of my five cohorts, including the one that had Bartholomeus Sinister Grassus himself fighting alongside with it, got seriously dented in the initial contact, but held on and broke one of the opposing warbands in the next turn. When the Roman cavarly, after some frantic maneuvring, then charged the rear of the warband line and another warband unit broke, taking the barbarian general with them, it proved too much for the nerves of the rest of the Blutwurst warriors, and they fled off the field of battle.
One - nil to the Romans -- on to the next tribe!
I'll let umpire Alan explain the campaign consequences of this battle, but suffice it to say for nowthat the Blutwurstians were seriously impressed by the might of civilisation, and a substantial number of them has decided to join Bartholomeus Grassus in his campaign.
It looks like we posted reports almost simultaneously. Gosh, what enthusiasm. I hope someone reads them.
ReplyDeleteAnyway, the campaign situation is that the Romans lost the equivalent of two units - one legionary and one horse archer. But they persuaded the Blutwursts to provide two units of warband and one unit of skirmishers as press-ganged auxilia. So not a bad outcome.
Bart may now move on and attack the remaining Germanic tribe...
Well, some of the photos have been viewed more than 10 times, so the pictures at least have an audience :).
ReplyDeleteAnyway, I'm all ready for bringing the joys of civilisation to the next tribe. And the next. And the one after that. And ... is there an end to these hairy fellows? :)