
Over the years, I've used several different ways of basing my miniatures, but lately I've been settling on a way I'm quite happy with. For as long as that will last, at least :).
For the bases themselves, [I use standard slottabases](http://www.nirya.be/snv/ttm/archives/000001.html) (hey, that was the _very first entry_ on TTM. Ah, nostalgia :) ), augmented by [some rare earth magnets](http://www.nirya.be/snv/ttm/archives/000137.html), though I am now eyeing [Galeforce Nine](http://www.gf9.com) bases, because they come with 'rubber steel' inserts to put in your movement trays or transport boxes, saving you an extra order elsewhere. I also like the GF9 bases because they are not slotted.
The disadvantage of slotted bases is of course that when you put a flat based figure (i.e. without the tab to fit in the base's slot) on the base, you will need a way to cover up the slot in the base. The classic recipe of white glue and sand does not work here, ending up with at best a local depression in the base, and at worst a clear hole. You need something that covers the slot well - some kind of wall filler like Polyfilla is the usual solution. I used that for some time, but have now found something which I think is ideal: P�o sand mortar from [Brico](http://www.brico.be):

The Pebeo range of mortars and textured gels is meant to create interesting textures for painters and interior decorators. As miniature wargamers are the world's foremost scroungers, we can of course use these things as well. In the case of the sand mortar, it makes an ideal basing material. It scoops easily, not being runny; it is fairly sticky so it sticks to the bases easily but not sticky enough so that you cannot easily wipe off any overspill on the figure itself; and its texture is just right to recreate a kind of rough terrain for the figure to stand on. The result when the stuff has been applied looks like this:

The mortar is dry after around 24 hours (though you can cut this short in a pinch if you don't mind risking your brush when you paint the not completely dried mortar) after which it can be painted and drybrushed just like normal:
The base above was finished with a few patches of [Woodlands Scenics](http://www.woodlandscenics.com] Blended Turf flock (I get mine from [EC Scenics](http://www.ecsenics.co.uk), glued on with gel form super glue.
All of my recently finished figures have been based in this way, and you can see the results on [my Flickr account](http://www.flickr.com/photos/robartes).
It's a fast and simple way of producing good looking bases. A future 'improvement' is that I will use lighter colors, more tans than browns, to paint the bases, as these look a bit dark when viewed en masse. But as most of my armies have had their bases painted with my current colors, I'll use the new colors for new armies (Carolingians to start with).
TT tags: miniatures wargames basing
A couple of questions :
ReplyDeleteI didn't find the P�o mortar in the Brico online catalogue - what's the price for what quantity ? How does it compare to Coat D'arms Brushscape ? It looks a bit rougher, isn't it too rough for single figures ?
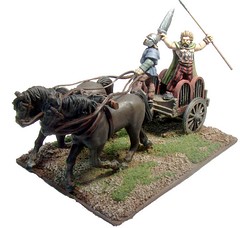
The Celtic Chariot : what are the reins made from ? Beatiful paint job BTW, looking at it almost give me a 'painters block'.
I didn�t find the P�o mortar in the Brico online catalogue - what�s the price for what quantity ?
ReplyDeleteI don't exactly remember, but I think it was around 7 euros for the pot, which is 250mL.
How does it compare to Coat D�arms Brushscape ? It looks a bit rougher, isn�t it too rough for single figures ?
It is certainly rougher than Brushscape, though it is less sticky, meaning it is easier to apply (it goes where you want it to go, as opposed to where it sticks first). I feel it is fine for single figures, but you can be the judge of that yourself by looking at my latest painted figures in the sidebar - they're all based with the Pebeo.
Finally, the reins of the chariot are made from strips of lead sheeting. You can get it in hardware stores (used for roof repairs) or in florists' (sometimes used for flower arranging, to keep pots watertight). Just cut strips to size with an exacto knife. It also makes great flag material.
Thanks for the compliment on the paint job :)
I'm truly touched and also a bit amazed that you actually listen to me! To take advantage of your current need of guidance from the superior mind (/cough) I'll pop you another question.
ReplyDeleteWhat kind of chemicals do you pop to paint a face as on the TTM man? Is there a trick/pattern to it or are your hands just exceptionally steady? Cause I for one also use layering but I never get the end result to look as crisp as yours.
What kind of chemicals do you pop to paint a face as on the TTM man? Is there a trick/pattern to it or are your hands just exceptionally steady? Cause I for one also use layering but I never get the end result to look as crisp as yours.
ReplyDeleteThere's a few tricks:
* Use a brush with a good, fine point (the size does not matter nearly as much as the tip. Now there's something to tell your wife :) )
* Thin your paint. It needs to flow smoothly off of the brush so you do not have to go over each area multiple times
* Steady your hands - grip the miniature in your non brush hand (for me that's right, for most of the rest of the world left) firmly, so it does not jitter. Then paint :) It helps to rest your wrists together so that any jitter is synchronised between your two hands :)
* Practice - after two hundred faces, you get to know where to put the paint. It's simple really -- I'll have to put up a post with a schematic some time in the future
* Caffeine and alcohol do help :)