
First a word about the rules. It is an elegant system, with an army list of units (you can choose what operational scale to play at - it makes no difference to the rules), each of which has a numerical rating (generally from 6 to 18) which represents its combat factor and morale factor. Weapons and doctrine may also be noted against the unit, defining what may be done by way of maneouvre, melee, firing range, etc. To give you an idea of how the game works, a volley of rifle fire from an average unit will do 1 or 2 hits at close range - thus the unhappy target unit may have a starting factor of 12 and this will go down to 10 if it is takes 2 hits. This is recorded on the unit roster. Every time hits are inflicted the victim unit must take a morale test. He rolls a D20 and if the score is equal or lower than the current roster score (in our example earlier it was 10) then the unit passes the test. If more, then the unit is shaken, if doubled, the unit retires, if trebled it flees from the game in disgust. So as the game goes on, attrition wears down a unit and at some stage it will break. There are of course modifiers, for example if a general is nearby, if you are hit in the flank. Important note - don't roll a 20 when testing morale, this automatically gives a result one level worse than would otherwise be the case.
Movement is simple and always has to be in conformity with the orders set for the unit. The distance you can move depends on the quality of your officer - the mechanic is a die roll per officer (who commands 3+ units, typically) and that is the number of units to move.
You get a D4 id a lousy officer, a D6 if normal or an average die if good.
Now I have bored you enough with the rules. The scenario is an action from 1864, a desperate attack by the Confederates against a flanking movement by Hooker's Union troops. I took it from the 'Charge' magazine on Magweb. Each side has roughly 20 units of infantry, with a big advantage for the Union in terms of artillery. I decided to give a couple of units of cavalry to the Confederates, even if historically they weren't on the field. why? I had painted them and wanted them see action and just to give the rebels a bit of a chance in what would be a stern ask.
The terrain is dominated by a three creeks that run from the confederate right to the centre of the table, where there is much marshy ground and a cornfield. On the left are woods all along the edge plus Kolb's farm halfway across the table. A road runs from the Confederate centre to the Union right. Each side is ordered to capture both ends of the road.
The Union plan is simple but effective, a concentration of their forces before the farm and across the table to the other side of the cornfield, leaving their left flank open. They are also allowed to place an ambush in the woods.
The Confederates split their forces. Two infantry brigades on the far right with orders to undertake a huge Napoleon style flanking move. Two brigades on the left with orders to capture Kolb's farm. The cavalry hold the centre. A solitary smoothbore artillery piece is to give support to the left flank.
With typical GW cunning, rather than use his Kentucky ambushers under Colonel Gallop, he asks me (in my GM role, though I am also playing the Confederate left due to the unfortunate but can't be helped absence of one of our players) if he can give orders to them and move them. Blithely I agree. From a Rebel viewpoint this is an error, as Gallop races out of the words to occupy the farm before I can get there. Damn.
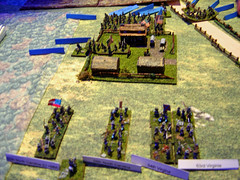
DSC00945_edited
Above: the rebel columns attack Kolb's Farm
On my turn, I march as fast as I can towards the farm, determined to take it. My supporting brigade finds a Grand battery in front of it and forms a firing line, spending much of the game firing at long range into the Union artillery causing sporadic casualties but not having much impact.
The story of the game is simple. A massive scrap for the farm, won by the Blues, thanks to their getting there first and taking advantage of the cover. I didn't help myself by entering into melee rather impetously and then rolling a couple of '20's on the dice at inopportune moments.
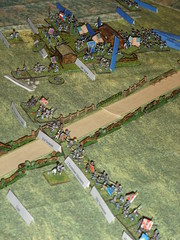
DSC00949
Above: storm over the farm, and the confederate firing line.
Gradually I was worn down and one brigade eliminated.
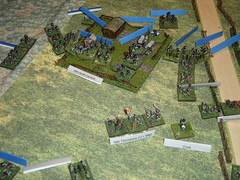
DSC00950
Above: last desperate attack by the Rebels, they are destined to be massacred.
On the confederate right, progress was too slow and though eventually a firing line against the Union left was established no coordinated attack was possible. Our cavalry, alas, suffered indecision and did nothing the entire game.
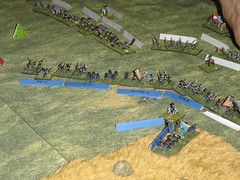
DSC00951
Above: The Union left holds up the Rebel attack
At about Midnight, with the Union advancing on all sides, my troops surrounded and hopes on the right flank in tatters, we fled back to Atlanta leaving the now battered and burnt Kolb's Farm to a happy Union pair of players (Graham W and Graham K).
A very good game, very enjoyable and a final result very similar to the historical one - the confederates made frontal charges across the front, stalled in the marshes and were massacred. I definitely want to play with these splendid little troops again, so nicely painted by JP.
Alan,
ReplyDeleteLooks like a great bit of fun. I agree with you regarding system's elegance. Nice pics. Too bad we can't get the detail to admire JP's always excellent painting skills.
Cheers, Bruce
Hi Bruce,
ReplyDeleteThe game hinged on a number of decisions, mainly the mistake my troops (I blame them not their commander) made in charging the Union line in the farm rather than engaging in a firefight.
The Adler figures are nice, very well proportioned and you get very nice results.
I am currently reading Shelby Foote's history (I may be announcing this for several months to come given the several thousand pages length of this tome) and am quite inspired to put on some more games. I think the First Bull Run, which is not too big an engagement, would be an excellent multi-player game.
How is the sabbatical going by the way?
Alan
Alan
ReplyDeleteIndeed it was a fun if sauna- like game. I must remember to pack some Mint Dewleps for next time. Amongst other things it inspired me to sort out my 1870 Prussians in an idle moment on SUnday evening. But I must finish the 18th C stuff first.
As the Union Left Flank player I confess to being quite concerned about receiving the attentions of 3 Brigades to my one. But then I was still thinking PoW Napoleonic and not the C19th set.
Thanks to both you and Graham W for putting on the game.
Graham K