My paint bottles are usually kept in boxes. I try to organize them by color (all the reds go together, all the blues, etc.), but I still have trouble finding a specific colour when I need it.
So, I was pleasantly surprised to find this product:
http://www.miniaturicum.de/index.php?infoBox=3&cPath=723
A must-have paint organizer rack for the discerning wargamer!!!

Thursday, 13 August 2009
Tuesday, 11 August 2009
Spanish treasure ship escapes French ambush!
Last Sunday, Alan and I played a game of Trafalgar using my [freshly painted](http://www.nirya.be/snv/ttm/archives/000301.html) [French and Spanish](http://www.nirya.be/snv/ttm/archives/000312.html) sailing ships. The scenario we played was one from the book, called 'Pursuit', which is a variation on the 'important ship needs to get off table' theme.
I played the Spanish, with 4 3rd rate ships of the line and one 1st rate, the _Principe d'Asturias_. I nominated one of the third raters, the _Bahama_, as the Spanish Treasure ship that needed to get off table (we quickly decided this was the [Spanish Treasure Fleet](http://en.wikipedia.org/wiki/Spanish_treasure_fleet), even if that had last sailed over a decade earlier). Alan played the French with six third raters (so he had the edge in number of cannon) but had to deploy in two seperate groups, as per scenario rules.
What follows is my view of how the battle developed.
As I had the wind advantage (the wind was blowing in the direction I needed to escape -- east, or towards the bottom in the overview photos of the table) and Alan thus had to tack upwind to get to me, I was in a very comfortable position. My first few turns were thus spent sailing towards the spot indicated on the photo below, not needing to decide anything yet. The French sailors, in the mean time, did not same to be able to remember quite what to do when needing to tack, and a full five out of six ships ended up in irons with some mast damage to a few. Good start!
The blue arrows in the photo below represent what I thought Alan would do, if his ships ever got underway.

Having, after a few turns, arrived at the decision point, I had three options:

Option A seemed the safest, with my five ships concentrated against just a few French. However, as the wind had now turned a point towards the south -- advantageous to the French -- and his farthest ships had set full sail and were thus chugging along at a fair clip, I thought that perhaps the French might yet catch me.
Option B, going down the middle, seemed to be the most risky as that would definitely land me in the middle of the French fleet.
Option C beckoned as a surprise alternative. Using it, I would have to hope that I could dash behind the northernmost (rightmost in the pictures) French squadron and sail off to safety.
In the end, this is what I did:

I decided to mix options A and B. The Spanish ships in the above picture are the ones with the blue markers (for full sail setting), so you can see that I sent three ships, including the _Bahama_, down path A, while two ships, including the _Principe d'Asturias_ went down path B in the hopes of interfering with the French ships that were closing the range fast. _Bahama_ would obviously have to remain at full sail and dash of at the utmost speed down the path indicated.
And with that, hostilities were opened and many a broadside was loosed. I suffered many hits on my ships, including many fires that luckily were fairly easy to put out on account of the rain that had started to fall. In response, the Spanish gunners turned out to be a panicky bunch that half of the time did not seem to be able to remember how to fire their cannon in the heat of battle, and that, when they did remember, were quite unable to do any real damage -- perhaps forgetting to actually load ball into their cannon, being satisfied with just the nice big bang (read: bad dice rolling on my part). Frustrating, especially when that meant that two unscathed (as opposed to at least somewhat damaged by the preceeding Spanish broadsides that would have been fired at them) French ships were able to cross the T of my northern 'screening' group (good maneuvring by Alan there):

Grumble. Luckily, however, what little damage and delay my ships could do to the French ships was enough to enable the Bahama to escape in the nick of time. Victory to the Spanish! Truth be told, it's probably the turn or so the French spent getting underway again after they failed to tack in the beginning of the game that saved me :).
Anyway, Alan and myself were pleased with the way the game played and with the result. We handled five or ships each and the game was played to conclusion in just 2,5 hours. Good ruleset!
More pictures of the game can be found [here on Flickr](http://www.flickr.com/photos/robartes/sets/72157621989562162/).
On to the next encounter!
I played the Spanish, with 4 3rd rate ships of the line and one 1st rate, the _Principe d'Asturias_. I nominated one of the third raters, the _Bahama_, as the Spanish Treasure ship that needed to get off table (we quickly decided this was the [Spanish Treasure Fleet](http://en.wikipedia.org/wiki/Spanish_treasure_fleet), even if that had last sailed over a decade earlier). Alan played the French with six third raters (so he had the edge in number of cannon) but had to deploy in two seperate groups, as per scenario rules.
What follows is my view of how the battle developed.
As I had the wind advantage (the wind was blowing in the direction I needed to escape -- east, or towards the bottom in the overview photos of the table) and Alan thus had to tack upwind to get to me, I was in a very comfortable position. My first few turns were thus spent sailing towards the spot indicated on the photo below, not needing to decide anything yet. The French sailors, in the mean time, did not same to be able to remember quite what to do when needing to tack, and a full five out of six ships ended up in irons with some mast damage to a few. Good start!
The blue arrows in the photo below represent what I thought Alan would do, if his ships ever got underway.
Having, after a few turns, arrived at the decision point, I had three options:
Option A seemed the safest, with my five ships concentrated against just a few French. However, as the wind had now turned a point towards the south -- advantageous to the French -- and his farthest ships had set full sail and were thus chugging along at a fair clip, I thought that perhaps the French might yet catch me.
Option B, going down the middle, seemed to be the most risky as that would definitely land me in the middle of the French fleet.
Option C beckoned as a surprise alternative. Using it, I would have to hope that I could dash behind the northernmost (rightmost in the pictures) French squadron and sail off to safety.
In the end, this is what I did:
I decided to mix options A and B. The Spanish ships in the above picture are the ones with the blue markers (for full sail setting), so you can see that I sent three ships, including the _Bahama_, down path A, while two ships, including the _Principe d'Asturias_ went down path B in the hopes of interfering with the French ships that were closing the range fast. _Bahama_ would obviously have to remain at full sail and dash of at the utmost speed down the path indicated.
And with that, hostilities were opened and many a broadside was loosed. I suffered many hits on my ships, including many fires that luckily were fairly easy to put out on account of the rain that had started to fall. In response, the Spanish gunners turned out to be a panicky bunch that half of the time did not seem to be able to remember how to fire their cannon in the heat of battle, and that, when they did remember, were quite unable to do any real damage -- perhaps forgetting to actually load ball into their cannon, being satisfied with just the nice big bang (read: bad dice rolling on my part). Frustrating, especially when that meant that two unscathed (as opposed to at least somewhat damaged by the preceeding Spanish broadsides that would have been fired at them) French ships were able to cross the T of my northern 'screening' group (good maneuvring by Alan there):
Grumble. Luckily, however, what little damage and delay my ships could do to the French ships was enough to enable the Bahama to escape in the nick of time. Victory to the Spanish! Truth be told, it's probably the turn or so the French spent getting underway again after they failed to tack in the beginning of the game that saved me :).
Anyway, Alan and myself were pleased with the way the game played and with the result. We handled five or ships each and the game was played to conclusion in just 2,5 hours. Good ruleset!
More pictures of the game can be found [here on Flickr](http://www.flickr.com/photos/robartes/sets/72157621989562162/).
On to the next encounter!
Spanish treasure ship escapes French ambush!
Last Sunday, Alan and I played a game of Trafalgar using my [freshly painted]() [French and Spanish]() sailing ships. The scenario we played was one from the book, called 'Pursuit', which is a variation on the 'important ship needs to get off table' theme.
I played the Spanish, with 4 3rd rate ships of the line and one 1st rate, the Principe d'Asturias. I nominated one of the third raters, the Bahama, as the Spanish Treasure ship that needed to get off table (we quickly decided this was the Spanish Treasure Fleet, even if that had last sailed over a decade earlier). Alan played the French with six third raters (so he had the edge in number of cannon) but had to deploy in two seperate groups, as per scenario rules.
What follows is my view of how the battle developed.
As I had the wind advantage (the wind was blowing in the direction I needed to escape -- east, or towards the bottom in the overview photos of the table) and Alan thus had to tack upwind to get to me, I was in a very comfortable position. My first few turns were thus spent sailing towards the spot indicated on the photo below, not needing to decide anything yet. The French sailors, in the mean time, did not same to be able to remember quite what to do when needing to tack, and a full five out of six ships ended up in irons with some mast damage to a few. Good start!
The blue arrows in the photo below represent what I thought Alan would do, if his ships ever got underway.
Friday, 7 August 2009
Franco Spanish fleet, part 2
And here are the pics of the freshly painted ships:
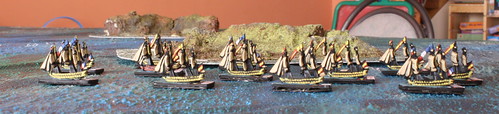
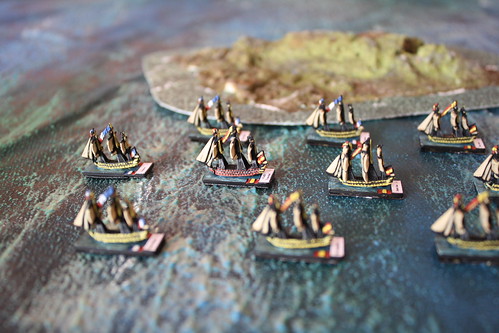
The terrain they're photographed on is my new terrain mat and islands from the imaginatively named Terrain Mat, which I highly recommend.
The terrain they're photographed on is my new terrain mat and islands from the imaginatively named Terrain Mat, which I highly recommend.
Thursday, 6 August 2009
Painting Log: Franco Spanish fleet, part 2
I just finished the remaining 14 ships of the Franco-Spanish fleet at Trafalgar. That's 14 points, or a total of 24 points so far this month. Next up in the painting queue is a new Skaven Blood Bowl team (basically a new set of figures I'm painting in the same colours as the ones I did over ten years ago - should be interesting to compare them).
Pictures of the ships to follow once it's light again :).
And I'm now sure that I did not get the right mix of ships for the engagement. I think I got the mix that is stated on the website for the Franco-Spanish fleet, but that does not correspond to the actual ships present at Trafalgar. As I've said, there's only one three-decker and two 'full sail' two-deckers, while at Trafalgar there was one four-decker and three three-deckers. Oh well, in this scale, it's not really noticeable.
Skaven Screaming Bell
The model below is the first Skaven Screaming Bell, issued by GW in 1993 or 1994. I always tought it funny that the Bell could move by itself, so I decided to use 2 Rat Ogres to pull the Bell. A Clan Moulder Packmaster and some giant rats makes up the full model.
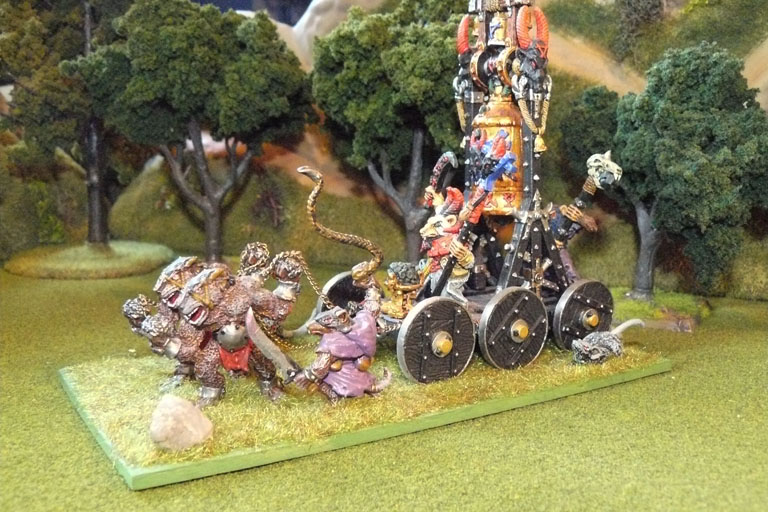
I am not sure what the current GW logic is moving the Screaming Bell. Some weird magical explanation involving warpstone probably ...
Anyway, my Screaming Bell never really saw action on the gaming table. I completed it after I was done with Warhammer, and since then, I never again played the large-scale fantasy games we used to have. I am still looking for the optimal fantasy mass battle ruleset though!
Wednesday, 5 August 2009
Uncharted Seas game
Yesterday my [new fleet](http://www.nirya.be/snv/ttm/archives/000306.html) got its first outing against both Frank's Shroud Mages and his Elves. Frank played with the Shroud Mages, Eddy took the Elves and Koen and myself were outnumbered with the Humans. The Shroud Mages and Elves had a standard fleet of 1 battleship, 3 cruisers and 6 frigates each, while we had that plus a squadron of 3 martyr frigates, all led by the mighty battleship _Tears of the Empress' Favourite Concubine_.
Some photos of the game can be found in this [Flickr set](http://www.flickr.com/photos/robartes/sets/72157621953457026/).
Our plan to take on the two fleets was simple: we had the wind advantage (the wind was on our starboard stern and side for most of the game), while the Elves would have to tack upwind to get to us (the Shroud Mages, being steam powered, were of course not influenced by the wind). So our plan was simple:

While the Elves were busy tacking towards us (as Eddy can be seen doing in the background), our capital ships (the _Tears_ and the cruisers) would form a line of battle using their powerful broadsides to engage the Shroud Mages and hopefully do some damage (as at this range, the Human fleet has the more powerful guns. Up close, the Shroud Mages are a bit stronger, but at medium to long range, our guns are better). The frigates would use their speed and maneuvrability to dart in amongst the Shroud Mage fleet and wreak as much havoc as they could. The martyr frigates would hang back and engage targets of opportunity.
Things went awry fairly soon. The martyr frigates, as can be seen by their conspicuous absence in the above photograph, advanced too impetuously and were destroyed by long range fire of both Elves and Shroud Mages. However, one of them did manage to get in among the Shroud Mage fleet and blow itself up, slightly denting one of their cruisers.
Our main battle line never really materialised. While the _Tears_ swung into line soon enough and managed to destroy a Shroud Mage cruiser, our cruisers never really got into a good firing position.
What did work though, were the frigates. The two normal (as opposed to martyr) frigate squadrons got into the Shroud Mage fleet and between them dispatched a frigate or two and a cruiser (a pack of three frigates firing close range linked broadsides into a cruiser -- albeit one already damaged by battleship fire -- is nasty)!
However, that was more or less the high point of the game for the humans. As the Elves swung towards us, the wind suddenly veered into an advantageous position for them (well played magic card by Eddy), bringing their cruisers and battleship into close range of our fleet. The _Tears_, while pouring broadside fire into the Elves, made a last attempt at fleeing behind the central island (hoping to insert itself between that island and the anchored Shroud Mage battleship on the other side of it, limiting its exposure to said battleship), but an unlucky main mast hit slowed it down just when it turned away from the Elves, setting up the perfect stern rake position for them.
We struck our flag at that point :)
It was a fun game, with a nice and fun set of rules. The [Uncharted Seas](http://www.spartangames.co.uk/uncharted.htm) rules have a good balance between complexity (or lack thereof) and speed of play. Things progressed swiftly (even though it was only Frank's and mine second game, and Eddy's and Koen's first) and I felt that there was enough tactical depth in the game to keep it at a level that is a bit more than rolling dice and see who rolls highest. Highly recommended!
Some photos of the game can be found in this [Flickr set](http://www.flickr.com/photos/robartes/sets/72157621953457026/).
Our plan to take on the two fleets was simple: we had the wind advantage (the wind was on our starboard stern and side for most of the game), while the Elves would have to tack upwind to get to us (the Shroud Mages, being steam powered, were of course not influenced by the wind). So our plan was simple:
While the Elves were busy tacking towards us (as Eddy can be seen doing in the background), our capital ships (the _Tears_ and the cruisers) would form a line of battle using their powerful broadsides to engage the Shroud Mages and hopefully do some damage (as at this range, the Human fleet has the more powerful guns. Up close, the Shroud Mages are a bit stronger, but at medium to long range, our guns are better). The frigates would use their speed and maneuvrability to dart in amongst the Shroud Mage fleet and wreak as much havoc as they could. The martyr frigates would hang back and engage targets of opportunity.
Things went awry fairly soon. The martyr frigates, as can be seen by their conspicuous absence in the above photograph, advanced too impetuously and were destroyed by long range fire of both Elves and Shroud Mages. However, one of them did manage to get in among the Shroud Mage fleet and blow itself up, slightly denting one of their cruisers.
Our main battle line never really materialised. While the _Tears_ swung into line soon enough and managed to destroy a Shroud Mage cruiser, our cruisers never really got into a good firing position.
What did work though, were the frigates. The two normal (as opposed to martyr) frigate squadrons got into the Shroud Mage fleet and between them dispatched a frigate or two and a cruiser (a pack of three frigates firing close range linked broadsides into a cruiser -- albeit one already damaged by battleship fire -- is nasty)!
However, that was more or less the high point of the game for the humans. As the Elves swung towards us, the wind suddenly veered into an advantageous position for them (well played magic card by Eddy), bringing their cruisers and battleship into close range of our fleet. The _Tears_, while pouring broadside fire into the Elves, made a last attempt at fleeing behind the central island (hoping to insert itself between that island and the anchored Shroud Mage battleship on the other side of it, limiting its exposure to said battleship), but an unlucky main mast hit slowed it down just when it turned away from the Elves, setting up the perfect stern rake position for them.
We struck our flag at that point :)
It was a fun game, with a nice and fun set of rules. The [Uncharted Seas](http://www.spartangames.co.uk/uncharted.htm) rules have a good balance between complexity (or lack thereof) and speed of play. Things progressed swiftly (even though it was only Frank's and mine second game, and Eddy's and Koen's first) and I felt that there was enough tactical depth in the game to keep it at a level that is a bit more than rolling dice and see who rolls highest. Highly recommended!
Skaven Rocket Team
In 1993, I attended EuroGencon. Apart from the Magic The Gathering craze that was starting, I also participated in a fantasy wargaming tournament using rules designed by Martin Hackett.
Part of the fun was that the army lists did leave a lot of room for designing your own troops. Instead of saying 'catapult' or 'trebuchet', it would simply say, 'war machine'. So I came up with a rocket launcher for my skaven army. Starting from a Nippon Rocket Team, I made a very small conversion of 2 skaven models; giving one a rocket to hold, and another a torch to light the fuse.
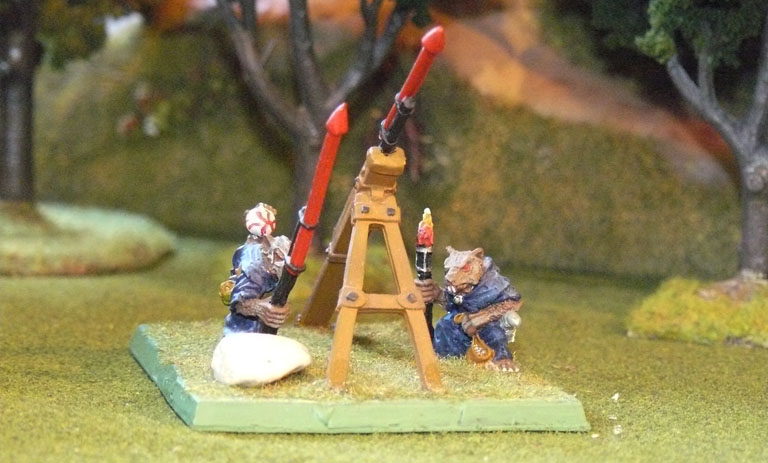
I didn't do well in the tournament though ;-)
Part of the fun was that the army lists did leave a lot of room for designing your own troops. Instead of saying 'catapult' or 'trebuchet', it would simply say, 'war machine'. So I came up with a rocket launcher for my skaven army. Starting from a Nippon Rocket Team, I made a very small conversion of 2 skaven models; giving one a rocket to hold, and another a torch to light the fuse.
I didn't do well in the tournament though ;-)
Monday, 3 August 2009
Skaven and the Escargotaurus
Way back, when Warhammer Fantasy Battles was still in its 3rd edition (1987-1991), I played Warhammer a lot. One of the nice features that was available in the Realm of Chaos books, was to give units chaos mutations. Skaven were one of the races that could receive chaos mutations, and it was encouraged to actually modify your miniatures such that they reflected physical the mutations.
The unit shown below is one of the units that featured in my skaven army. Besides some non-physical mutations, the unit received an alternate head mutation, and a changed forelimb. I tried to work that theme into the miniatures by replacing some heads, as well as some arms.

The skaven bodies are all from the Warhammer Regiments box, except one giant rat (giant rat 1) body (front right) and a skaven character (verminlord with halberd) (far left). The head mutations are (from left to right and back to front): unchanged skaven head on character model, goat's head from Chimera model, fly from a plastic toy, added horns to skaven head, genestealer (Spacehulk model), horse (plastic toy), pelican (plastic toy), lizard (plastic GW), deer (plastic toy), chaos hound, a very weird head mutation -- tail from the same chimera and finally a dragon head (also from chimera, he served well!) on chaos spawn.
The arms are the following: genestealer, no change, genestealer, space marine bionic arm, crab's claw (plastic toy), no change, no change, changed weapon, no change, skeleton arm, no change, and the chaos spawn doesn't have any arms.
A second model that was a conversion for my chaos forces was the model I dubbed the Escargotaurus. A cross-breed between a giant snail (from a plastic toy model) and a minotaurus was the focal model of my army. The minotaur body is from Advanced Heroquest, the wings (which were there to help the creature to keep itsbody straight) are from the same chimera model mentioned above.
 I must say I had fun creating these models. I don't know whether such models would still be allowed under the current WFB rules, but they served me well on the battlefield many years ago!
The unit shown below is one of the units that featured in my skaven army. Besides some non-physical mutations, the unit received an alternate head mutation, and a changed forelimb. I tried to work that theme into the miniatures by replacing some heads, as well as some arms.

The skaven bodies are all from the Warhammer Regiments box, except one giant rat (giant rat 1) body (front right) and a skaven character (verminlord with halberd) (far left). The head mutations are (from left to right and back to front): unchanged skaven head on character model, goat's head from Chimera model, fly from a plastic toy, added horns to skaven head, genestealer (Spacehulk model), horse (plastic toy), pelican (plastic toy), lizard (plastic GW), deer (plastic toy), chaos hound, a very weird head mutation -- tail from the same chimera and finally a dragon head (also from chimera, he served well!) on chaos spawn.
The arms are the following: genestealer, no change, genestealer, space marine bionic arm, crab's claw (plastic toy), no change, no change, changed weapon, no change, skeleton arm, no change, and the chaos spawn doesn't have any arms.
A second model that was a conversion for my chaos forces was the model I dubbed the Escargotaurus. A cross-breed between a giant snail (from a plastic toy model) and a minotaurus was the focal model of my army. The minotaur body is from Advanced Heroquest, the wings (which were there to help the creature to keep itsbody straight) are from the same chimera model mentioned above.

Sunday, 2 August 2009
Uncharted Seas human fleet
... and they're done. Bartholomeus Sinister Grassus' (also known as Black Bart in this setting) fleet is ready to take to the seas:
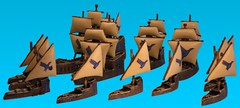

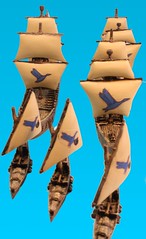
That's one battleship, three cruisers, 6 frigates and 3 martyr ships (frigates that go boom, as indicated by the ducks carrying bombs on the sails), or 10 points worth of Olley points. Good start to the month.
I'm not entirely happy with the decals though. First off, they turned out to be on white paper, so I had to rethink how I was going to do them and print a dark background for them. Second, I'm not that pleased with how they sit on the sails - probably the same as a commercial decal, but still. Oh well, this was my first time using decal paper like this, so let's call it a learning experience.
Subscribe to:
Posts (Atom)