Sunday, 6 January 2013

Attracting cannons

As mentioned before, I'm building a Bavarian horse battery. Actually it's finished, crew and all, but not based yet, so pictures will follow later. I'm also going to paint something else before I paint the limber I prepared for this battery just to have some change in 'painting scenery'. But that's not the reason for this post.

I'd just like to show a neat little trick, well beloved of the Warhammer 40K crowd who like to experiment with various weapons for their models while still retaining WYSIWYGedness (so actually representing said weapons on the miniature). They deal with the issue of a single model possibly needing several weapons with strong neodymium magnets, magnetising the weapons and their attachment points so they can easily be switched and are yet still firmly attached during use. I did something similar for the guns and limber:

IMG 1262
IMG 1263
IMG 1264
IMG 1265

As you can see in these pictures, the gun, its base and its limber all have magnets glued to them. The magnets are various shapes and sizes because I want them to be not so noticeable. The magnet under the gun carriage is, well, under the gun carriage so is not visible in normal use and is thus the largest. The magnet on the base is small so I can hide it in the gunk and flock that gets applied to the base, and the magnet on the limber is small and round because that fit it best :). While these magnets are small they are strong enough, particularly because they are attracting each other, to keep the gun in its place whether it is unlimbered (I'll leave it loose on the base) or attached to the limber in limbered mode. In fact, the limber magnet is strong enough to drag the gun along when the limber is moved :). This way, I can have a single cannon for both limbered and unlimbered models.

The only tricky thing with this is that these magnets have, like all magnets until the LHC finds the fabled monopoles, two poles. You have to take the polarity into account when you glue the magnets down or the things repel each other, which is not what you want. The way I do this is glue the first magnet down, in this case it was the one on the carriage, then stick the second magnet to the first (it will automatically 'snick' into the correct polarity) and put a dot on the side of the second magnet that is on the bottom (i.e. away from the first). Then unstick the second magnet and glue it dot–down to the base or limber.

I get my magnets from supermagnete.be (that's note a typo—it's a German firm, hence the supermagnete), which I highly recommend for their wide assortment and prompt delivery.

Wednesday, 2 January 2013

State of the Tiny Tin Man: past

Yesterday was New Year's day (i.e. we have arrived at a certain arbitrary point in the orbit of the Earth around the Sun, which is customarily taken as the beginning of a new orbit and thus of a new year—enter party hats, fireworks and falling over on the front lawn hugging a Christmas ornament). This seems as good a point as any to look back to 2012 and forward to 2013 (it being dual faced January, after all) and go over my hobby accomplishments (or lack thereof :) ). This post looks back at 2012, the next will look forward to 2013 and detail the obligatory wildly unrealistic gaming plans for that year.

IMG 1260
Two pages of my wargaming notebook, on the contents of which I based most of this post

Painting


2012 was not that good a year for painting. I totalled 210 Olley points, but fully half of them (107) were achieved in the last two months. Here's the breakdown:

January:   16 points
February:  16 points
March:     25 points
April:     12 points
May:       a vast absence of any painting
June:      a vast absence of any painting
July:      a vast ab… no wait - 2 points
August:    18 points
September: 2 points
October:   10 points
November:  50 points
December:  57 points

As a reminder, Olley Points were introduced by wargaming luminary Phil Olley as a means of tracking and predicting painting output. Classically, you assign one point to a painted infantry man, two to cavalry and extrapolate from that. For me, I more or less equate points to time, with one point being about three quarters of an hour of work—the time it takes me to paint a single 28mm infantry figure (The One True Scale) from bare metal to finished paint job.

As you can see, there was a big gap in painting output in spring and early summer. At that time, I was involved in a transition project at work which often meant working at night at home as well. And on those nights where I did not work I was usually too knackered to be bothered to paint. Luckily, Crisis in early November stoked the painting fires again, rescueing some of the year painting wise.

Games played


For wargames played 2012 was another strong year, with 20+ games of various shapes and sizes taking place, both at my place and at Phil's. Highlights include the many games with the Great Northern War and Napoleonic collections and the smash hit Antares 2401 narrative campaign at Phil's (I play Gamma Squad, Rattkopf's Jammers). We also played the first three games of the Raid on St. Michael mini campaign by CS Grant (set in the GNW), but that did not catch on as well as the Antares campaign.

Writing and blogging


I got two articles published in Battlegames Magazine (well, the first was 2011, but it was late enough to count as 2012 :) )—the Command Challenges in issues 27 (Malatitze) and 31 (By any means river crossing) are mine. The Schild en Vriend Plan for World Domination is coming along fine :). On the other hand, this blog was dying a slow death in the first part of the year, so much so that I considered retiring it. In the end, I moved the blog to its current home at Blogger which seems to have revived my post count a bit.

Projects


I did not find a blog post detailing which projects I would tackle this year, which is probably a good thing :). In 2012 I did not start a new project but steadily built up my existing ones, with more units for the Great Northern War Swedes and Russians, as well as Bavarians and Austrians for the Napoleonic collection. That last got a big boost due to the Crisis game this year, which focused on the crossing of the Stadtler Arm of the Donau during the battle of Aspern-Essling. The preparations for that game forced me to finish the basing of the existing units and paint up some new stuff. In addition to these horse and musket periods, I also worked on quite a bit of 1:300th WWII and modern scenery. But otherwise, no new projects were started, unless you count the embryonic mass battle fantasy which was kicked off with this trunk headed fellow.

On to 2013 in the next post!

Monday, 31 December 2012

Final unit for 2012: Roman auxiliary archers

Painted a few days ago, photographed today, the last unit completed in 2012:

IMG 3083

They're reinforcements for my Roman army, which I hope will see lots of action in 2013. The figures are Warlord Games Western Auxiliary archers, I strung the bows with normal-ish sewing thread.

Sunday, 30 December 2012

Death by a million vent lines - or: one way to spend 4 hours with toy soldiers

Next on my project list of units to paint (yes, I keep a list—it helps to keep the momentum going) is the horse battery of the Bavarian army 1st Division of 1809. I already have the 1st infantry brigade and the cavalry brigade painted (4 line units, 1 light, one unit of dragoons and two of chevauxlegers plus asserted brass and lace to command them), and the horse battery is up now. This is the battery of Hauptman Ferdinand Regnier, which featured prominently and gloriously in the engagement at Arnhofen.

I'm representing the battery by 3 6–pounder gun models and 1 7–pounder howitzer. Bavarian horse artillery is of the wurst variety, where the gunners ride on cushions on the back of the gun carriage (not the limber) during transport. As the Bavarians used Austrian guns, I did the same and use Perry Miniatures Austrian artillery for my guns. The gunners will be replaced by Foundry Bavarian gunners. Very nice models, these Perry guns, but their mould maker seems to suffer from a 'never enough vent lines' syndrome.

Virtually every single nub, rivet and whatnot on the carriages and every single bloody spoke on the wheels (I counted) had the little worms of pewter attached. Which is why this took me 4 hours to build:

IMG 3079

OK, I admit it - building a limber and stringing the traces also took some time, but as I abhor cleaning up miniatures, the time spent cleaning up the guns and carriages left a much bigger impression :). The limber is built from French pieces by Front Rank, BTW. I'll be replacing their riders' heads with Bavarian artillerists' heads (Foundry again).

More to follow as and when the various bits of the battery get painted, but I had to get this off my chest :)

Friday, 28 December 2012

Antares 2401 Campaign: Mission IV succesful

Recently we finished the 4th game in our SciFi skirmish campaign, Antares 2401. The game involved four squads of StarMarines laying an ambush to a convoy of the Icycle Kingdom on the planet Polaris VI.

I will not write the usual game report, just show you some pictures. I will also outline the philosophy of the campaign - but let's first look at some photographs, shot by Bart Vetters.

General overview of the gaming table. The convoy is slowly
progressing along the road, but the ambush is not sprung yet.

The fighting has started. All squads appear from their hiding places,
laying fire on the poor Icycle Kingdom warriors.
Note the snowbeasts pulling large sleds with supplies.

Eddy, Bastiaan and Koen discussing the finer tactics of the StarMarines of SpecOps.

Ambush in full swing. Both sleds are demolished, and fierce small arms fire is exchanged
between the StarMarines of SpecOps and warriors of the Icycle Kingdom.
 The Antares 2401 campaign started as a combination of ideas. I had some 25/28mm science fiction figures lying around of various manufacturers (including some 80s Games Workshop Space Marines, the so-called 'beakies'), and I wanted to put them to good use. That was idea #1.

Idea #2 centered around my plans - several years old - of running a WW2 campaign featuring special operations. Every player would control a platoon of SAS/SBS/... soldiers, and games would involve several historical known and lesser known raids (Bruneval, St-Nazaire, ....). Between raids, surviving figures would gain additional abilities or special skills. This format would also allow players joining or dropping out of the campaign rather easily. Within the backstory of the campaign, it simply meant new platoons being added or withdrawn from the Orbat of the special forces.

Idea #3 was to experiment with open-source games design. Instead of laying down the game mechanics from the beginning, I wanted to start very simple, and add/change/modify rules as more games were being played, with a significant input from the players. The basic framework involved 2 mechanics:
  • Every figure has a number of action points which can be spent to move/fire/melee/special actions ... I borrowed it from one of my all-time favourite boardgames, Space Hulk. I think it works very well in a skirmish-setting, in which every player controls only a handful of figures. We have used this idea before in games like AquaZone (featured on CRISIS 2009).
  • A 2nd mechanic involves firing personal weapons. Since we play on a hexgridded terrain, we can easily count the distance in hexes. A shot is succesful if the roll of a die is larger or equal than the range. This is a very neat way of building in distance modifiers, and makes players think about crossing open terrain, moving through dense terrain with limited visibility etc.
So, the Antares 2401 campaign was born out of a combination of the above ideas. And I think the campaign works very well so far, which is a bit of a surprise, since wargaming campaigns are known for bogging down and grinding to a halt.

So what are some of the key issues that make this campaign succesful?
  • Personalization. Every player controls a designated squad, and every figure in the squad has a name. Figures can gain additional abilities between games, and built up a history of heroic deeds or heroic deaths. Moreover, players can customize their squads by providing names, battlecries, insignia (repaint the figures ...) and so on.
  • Mission Reports. After every mission, every player must write a mission report to Divisional Command. This serves various goals: it keeps players emotionally attached and it develops the backstory of the campaign and of each squad. But the most important aspect of the reports are the 'recommendations'. Each squad commander has to recommend/report to DivComm future courses of action. This can include suggestions for new missions or investigations (story elements), or new training procedures (new special abilities), new weapons (new equipment) etc. I use die rolls to decide the outcome of each recommendation, and write mission dispatches from DivComm to inform the players back.
  • Player involvement. As mentioned before, players can provide input for the campaign. But after each game, we usually have a short debriefing about what rules worked and what rules didn't. We update the rules after every game, but the GM has final say. Input from the players develops the game in a direction everyone (hopefully) likes, but the GM guards the coherency and elegance of the ruleset.
  • No pressure on participating. Games are played with the squads of players that can participate in a given game. If a player is not present, his squad simply does not take part in the mission, but then, his squad does also not get additional experience. This framework makes it easy for players to participate at their own pace, something that is often the deathknell of more traditional campaigns.
  • Variations in Setting and Scenery. Since the campaign is about special operations all over the galaxy, each game can feature a different set of scenery. We have played games on a jungle planet (Sardonis IV), a desert planet (Kalahari V), and 2 snow planets (Polaris VII and Polaris VI) so far.
I like the framework of the Antares 2401 campaign, insofar I am already thinking about expanding it to other settings as well. Perhaps a fantasy theme could include a tribe of warriors, each player controlling their own family or kin, and raiding the neighbouring countries - a Viking campaign could be a historical Dark Ages equivalent. We'll see. For now, we'll stick to scifi :-)

==> See also a previous blogpost about this campaign, Action on Kalahari V. It features some of the mission reports written by the players.


Busch's Grenadiers and some wild Celts

As said, December is a very productive month painting wise here at the Command Post (I live above the Post Office, and when we play games we Command our toy soldiers—hence the moniker). Here's some of the recent output, already shown before but now all dolled up:

IMG 3071

These are of course the odd couple Stomachabundix and Loonix, both shown before but now based. Unfortunately, and I only noticed this in this picture, it seems some of Loonix tattoos have run a bit. I probably did not wait long enough before putting the varnish on …
And here's the full unit of Busch's Grenadiers for the Great Northern War:

IMG 3075

And unphotographed but finished tonight are 8 Warlord Roman archers - 57 Olley points for December!

Wednesday, 26 December 2012

Wet paint: beware, dangling bits!

Next off the painting desk are two Warlord Games Celtic druids: Stomachabundix and his somewhat more free spirited nephew Loonix.

IMG 1251 IMG 1248

The pictures were taken on the painting desk with my iPhone, hence the their 'softness'—the camera on the iPhone is a royal pita to get to focus on something you want and not on what it wants. In this case, the letters on the paint pots seemed much more interesting to focus on to the camera (which is quite logical, they're black on white so much more contrasty for the AF algorithm to lock onto). Better pics to follow when I have based them.

Monday, 24 December 2012

Swedes repulsed at Tcheploievka! Captured Tsar exchanged for safe passage home!

We have played a lot of games with my Great Northern War collection, and most of them were some sort of scenario. While this is of course very realistic and commendable, sometimes one gets the urge to just put all the toys on the table and have a go. Which is just what we did over the course of two wargame evenings.

The battle we played was a fictional one, designed to bring the entire collection (minus some odds'n'ends) to the table in a straight up line-em-up-and-go game. Being a somewhat compulsory scenario writer, I could not leave things just like that of course, so I came up with a bit of backstory to put things in perspective. The battle is set in latish 1708, after Lewenhaupt was defeated at Lesnaya and had finally joined the main army, without the supplies he had been escorting over from the Baltic coast. Charles, knowing that wintering without his supplies would be difficult, had turned the army south to the Ukraine, lured by the prospects of waving fields of grain and an alliance with the Ukrainian Cossacks of Mazeppa. In reality, this ended up in a horrifyingly severe winter camp and the siege and defeat at Poltava the year after. In my alternate version of history, Charles manages to catch the Russian army near the village of Tcheploievka (current day Chapliivka in the Ukraine Sums'ka Oblast - I googled it :) ) where he had just crossed the Desna river on his way south. Knowing that this could be the decisive battle of the campaign, the armies line up to fight on the Ukrainian plain.

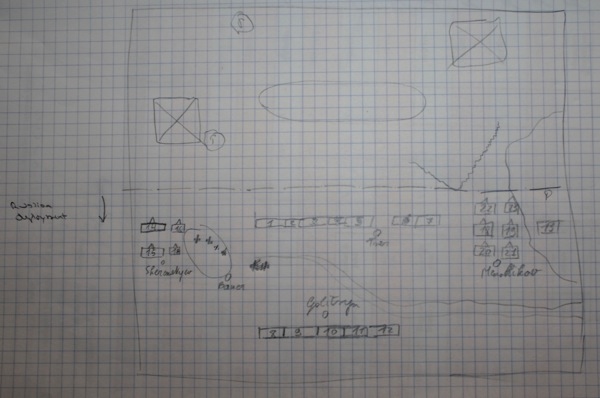
The first players to arrive got the task of coming up with the Swedish, resp. Russian plan. They were provided with a list of forces available and had to divide them in commands (a number of commanders was available to both sides) and draw the deployment of the various commands on a sketch map of the battlefield. Eddy, stepping in to the role of Charles XII, set up with a schwerpunkt of Swedish infantry on the left flank, screened by the woods left and all of the Swedish cavalry on the right:

IMG 3062
The Swedish plan. A & B are infantry commands, C & D are cavalry

Koen, taking up the baton of Tsar Peter I Romanov, deployed in a more conservative setup, with two lines of infantry (one behind a small stream) and cavalry on either flank:
IMG 3063
The Russian plan. Infantry in the centre, cavalry on the flanks

With the plans set up, Phil joined the Russian side and I played on the Swedish side. I was given command of the infantry (both brigades) by King Eddy while he himself took up the rein of the cavalry commands. The Russian command arrangement was more cooperative, with both Koen and Phil calling the shots all over the army.

By virtue of a dice roll, first move went to the Swedes. Eyeing the Russian setup, I knew I had a chance of breaking through their infantry lines, as the second line was too far back to give immediate support and the right flank cavalry (left for me) was hemmed in between their infantry and the woods. I could keep said cavalry screened with only one or two infantry battalions while the rest surged forward to assault the Russian line. If I could bring in the assault well and if Eddy managed to keep my right flank clear, we were in with a chance.

IMG 3010
The Swedish deployment

IMG 3013
The Russian deployment

IMG 3017
The Russian High Command feels optimistic about their chances

IMG 3018
King Eddy moving up the cavalry

The first two turns of the game saw a general advance of the Swedish infantry (though slower and less organised than I wanted—some failed command rolls), as well as an interesting sideshow by Russian Cossacks. Two squadrons (well, mobs) of Russian Cossacks had decided that their position on the right flank was not suitable for them and had taken it upon themselves to launch into a gallop across the battlefield between the two walls of infantry:

IMG 3016
Adventurous Russian Cossacks can be spied between the two lines, moments before they would be chased off the battlefield

This was of course a target too juicy to leave out there, and a good blast of the Swedish guns and one charge of the Life Guard Grenadiers later, the Cossacks were set off in flight through the Russian lines. In hindsight, this might have been a mistake on my part. While it was fun chasing off the Cossacks with the Guard, it was probably useless—it is highly unlikely the light cavalry would have been able to impress the Swedish cavalry, particularly because they had to cross within easy range of the Swedish artillery for a few turns. Worse yet, chasing after the Cossacks disrupted the Swedish infantry line even more. In fact, due to this and the overall command malaise in the Swedish infantry (General Roos, one of the infantry commanders, managed only one successful command roll during the entire game. The only other times his troops advanced, it was because he Blundered or because the King commanded them.), the Swedish infantry attack devolved into a number of individual battalions struggling forward instead of combining into the steamroller assault I had in mind.

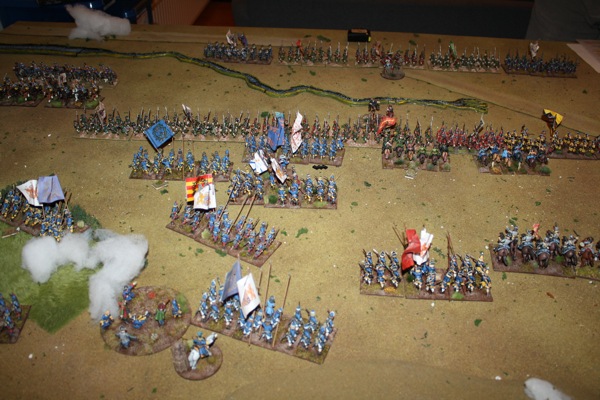
After the pleasant interlude with the Cossacks, things got more serious. Over on the cavalry flank, a swirling melee was developing that would more or less take all game to resolve, with both sides fighting each other to exhaustion (as a good cavalry melee should be). On the infantry front, the piecemeal infantry advance meant that the initial charge against the Russian line was carried out by only a single unit. Luckily, or not, it was the most powerful unit in the Swedish battle order—the grenadiers of the Livgardet till Fot, the Guard Grenadiers. With a cry of GĂ¥ PĂ¥ they crashed into the Tverski regiment, pikes at the ready and swords drawn:
IMG 3022
Swedish Livgardet till Fot crash into the Tverski, supported by scattered Swedish infantry

IMG 3024
A snapshot of the cavalry melee on the Swedish right

The world held its breath as battle was joined between the Swedish and Russian infantry. This was a high stakes fight, as both sides had a commander in the melee. On the Swedish side, Adam Lewenhaupt hoped to erase the stain of his defeat at Lesnaya by being the first to break through the Russian line. On the opposite side, none other than Tsar Peter I Romanov himself had joined the Tverski regiment as he knew how important it was to hold the line. When the shouts had died down and the dust began to settle, the vaunted Guard Grenadiers were seen to be streaming back to their own lines—the Swedish Guard had broken, leaving Lewenhaupt lying wounded on the field! On the Russian side the damage was worse however, as two units in the line (Tverski and neighbouring Schlusselburgski which had supported them) had broken. Worse yet, Tsar Peter had been captured in the melee and brought to the Swedish line by a pocket of grenadiers that had not lost unit cohesion. The Tsar was captured!

IMG 3025
The Swedish have broken through the first Russian line, but can they exploit the break before the second line comes up?

Despite the loss of the Guard, things were now looking up for the Swedes. We had a break in the Russian first line, and the second line, while it had come closer a bit, was still not yet within supporting distance of the first line. The race was now on to see whether we could exploit the break before the second line moved up.

IMG 3028
Russian command still seems optimistic, despite the loss of the Tsar

IMG 3029
The Swedish cavalry commander assuring the infantry command that their flank would be covered

IMG 3045
The crucial phase, seen from the Russian perspective. Note the disjointed Swedish infantry units

With the time pressure keenly felt by all Swedish commanders, infantry assault after infantry assault was thrown against the Russian line. But it was not to be. Because of the haphazard approach of the Swedish infantry, none of the assaults had quite the punch to cause great damage to the Russian line. While another three Russian infantry units were broken (I/Archangelski, Smolenski and Von Repnin's Grenadiers), this exhausted the Swedish infantry. The second Russian line, in a perfectly coordinated manoeuvre, had by now moved up. With the realignment of the right flank cavalry (static in the game till then) and the remainder of the first infantry line, the exhausted Swedes now faced a full line of fresh Russian troops who could easily hold them off with their firepower.

IMG 3049
The godly hand of the Tsar's deputy aligning the infantry lines.

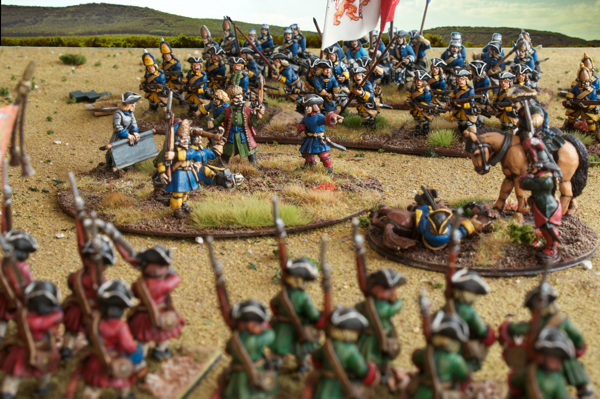
King Charles, whilst being a bit of a battlefield nutcase in general, let his better sense guide him in this battle and promptly signalled the Russian command the intent to negotiate. After much wrangling, it was decided that Tsar Peter would be returned to the Russian lines in return for the safe passage of the Swedish army back across the Desna. The war would not be over this year.
IMG 3067
King Charles and Tsar Peter negotiating the end of the battle

This was a good game and a good Russian victory. While a big component of the Swedish loss was due to the uncoordinated infantry attack (mea culpa—Eddy on the other hand did a great job of keeping the Russian cavalry at bay), another big contribution to the victory was the fact that Phil did not lose his cool when the first Russian line was being assaulted. His response of moving up the second line, pulling back the first line and deploying the cavalry was the perfect game winning countermove. Well played!

Sunday, 23 December 2012

Elephant Man

One of the project ideas playing around in the back of my head for 2013 is mass fantasy battle. Rules would be a modified Hail Caesar or a home brew set by rules writer extraordinaire Phil. As to figures, I have of course already amassed a sizeable lead and plastic mountain for this, consisting of dwarfs, elves, orcs and some weirder stuff. This is one of the weirder bits:

IMG 3059IMG 3060IMG 3061

This is (obviously) an elephant man figure from Dragonblood Miniatures (called Cavalcade Wargames when I ordered them). For some reason I think he is going to be an ally for the dwarfs. No idea why though.

As an aside, the Russian Grenadiers of the previous post have now been brought up to their full 18 painted miniatures, but I'm only photographing and posting them when the basing is finished. December has been a very good painting month, reaching 47 Olley points, with maybe more to come.

Tuesday, 18 December 2012

Wet paint: Busch's grenadiers

Let's revive my tradition of driving up the post count with pictures of freshly painted toy soldiers, before they are even based or anything:

IMG 3043

These are Busch's Grenadiers, a Russian Great Northern War unit, posing in front of my wall of paint. The figures are Reiver Miniatures, the wall of paint is Foundry :).